Driveshaft check (Every 12 000 miles or 12 months)
1 Carry out a thorough inspection of the driveshafts and joints as follows.
2 Jack up the front of the car and support it securely on axle stands (see “Jacking and Vehicle Support”).
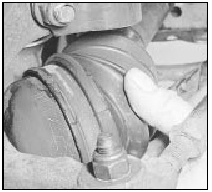
3 Slowly rotate the roadwheel and inspect the condition of the outer joint rubber bellows.
Check for signs of cracking, splits or deterioration of the rubber which may allow the grease to escape and lead to water and grit entry into the joint (see illustration). Also check the security and condition of the retaining clips. Repeat these checks on the inner constant velocity joints. If any damage or deterioration is found, the bellows should be renewed as described in Chapter 8.

29.3 Checking driveshaft outer joint rubber bellows
4 Continue rotating the roadwheel and check for any distortion or damage to the driveshaft.
Check for any free play in the joints by first holding the driveshaft and attempting to rotate the wheel. Repeat this check by holding the inner joint and attempting to rotate the driveshaft. Any appreciable movement indicates wear in the joints, wear in the driveshaft splines or loose retaining nut.
5 Road test the car and listen for a metallic clicking from the front as the car is driven slowly in a circle with the steering on full lock.
If a clicking noise is heard this indicates wear in the outer constant velocity joint caused by excessive clearance between the balls in the joint and the recesses in which they operate.
Remove and inspect the joint (Chapter 8).
6 If vibration, consistent with road speed, is felt through the car when accelerating, there is a possibility of wear in the inner constant velocity joint. If so, renewal of the driveshaft inner joint will be necessary.
See also:
Facia panel switches - removal and refitting
1 Disconnect the battery negative lead.
Rocker switches and push button
switches
2 Using a thin-bladed screwdriver, carefully
prise the switch from the facia panel.
3 Disconnect the wiring plug a ...
Fuses, relays and circuit breakers - general information
Pre-1986 models
1 The fuses and most of the relays are
located in a plastic box attached to the
bulkhead on the driver’s side of the engine
compartment.
2 The fuses are numbered to identify the
...
Engine oil
Checking the engine oil
Refer to the scheduled maintenance guide for the appropriate intervals
for checking the engine oil.
1. Make sure the vehicle is on level ground.
2. Turn the engine off an ...
