Sump - removal and refitting
Note: New gaskets and sealing strips must be used on refitting.
Removal
1 Disconnect the battery negative lead and
drain the engine oil (see Chapter 1).
2 Refer to Chapter 5, Part A and remove the starter motor.
3 Unbolt and remove the clutch cover plate.
4 Extract the sump securing bolts and remove the sump. If it is stuck, prise it gently with a screwdriver but do not use excessive leverage. If it is very tight, cut round the gasket joint using a sharp knife.
Refitting
5 Before refitting the sump, remove the front
and rear sealing strips and gaskets. Clean the
mating surfaces of the sump and cylinder
block.
6 Stick new gaskets into position on the block using thick grease to retain them, then install new sealing strips into their grooves so that they overlap the gaskets (see illustrations).
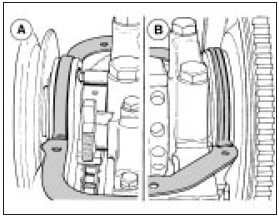
5.6a Sump gasket fitting details at timing cover end (A) and flywheel end (B)
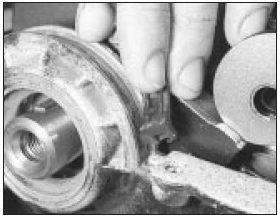
5.6b Fitting the sump gasket sealing strips to overlap the tabs on the gasket
7 Before offering up the sump, check that the gap between the sump and the oil baffle is between 2.0 and 3.8 mm (see illustration).
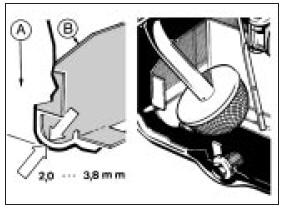
5.7 Sump and oil baffle clearance details
A Sump B Baffle
8 Screw in the sump bolts and tighten in three stages to the specified torque in the sequence shown (see illustration).
a) Stage 1- in alphabetical order b) Stage 2 - in numerical order c) Stage 3 - in alphabetical order
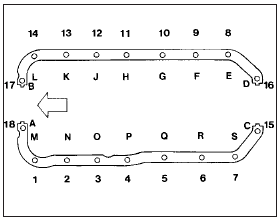
5.8 Sump bolt tightening sequence
9 It is important to follow this procedure in order to provide positive sealing against oil leakage.
10 Refit the clutch cover plate and the starter motor and reconnect the battery.
11 Refill the engine with the correct grade and quantity of oil.
See also:
Rear brake backplate (drum brakes) - removal and refitting
Caution: Refer to the
precautions in Section 1.
Saloon, Hatchback and Estate
models
1 Remove the rear brake shoes.
2 Disconnect the handbrake cable from the
backplate by extracting the U-clip.
...
Fuel pump - removal and refitting
Note: Refer to the precautions at the end of
Section 1 before proceeding.
Removal
1 The fuel pump is bolted to the underside of
the car just to the rear of the fuel tank. For
access raise and sup ...
Door - removal and refitting
Front door
1 On models with electric mirrors, electric
windows, central-locking, door-mounted
speakers, or “door ajar” sensors, remove the
trim panel and disconnect the wiring inside
the door. Wi ...
