Engine/transmission - reconnection and installation
1 This is a direct reversal of removal and separation from the transmission. Take care not to damage the radiator or front wings during installation.
Reconnection
2 Make sure that the engine adapter plate is
correctly located on its dowels.
3 On manual transmission models check that the clutch driven plate has been centralised as described in Chapter 6. Smear the splines of the transmission input shaft with molybdenum disulphide grease and then, supporting the weight of the transmission, connect it to the engine by passing the input shaft through the splined hub of the clutch plate until the transmission locates on the dowels. Screw in the bolts and tighten to the specified torque. Refit the clutch cover plate and the starter motor.
4 On automatic transmission models ensure that the torque converter is fully seated on the transmission, then locate the transmission on the engine dowels while at the same time guiding the torque converter studs through the holes in the driveplate. Screw in the engine-totransmission bolts and tighten to the specified torque. Turn the crankshaft to provide access to each of the torque converter studs in turn, then fit and tighten the nuts. Refit the cover plate and the starter motor.
Installation
5 First check that the engine sump drain plug
is tight and then, where applicable refit the
selector shaft cap nut (removed to drain the
manual transmission oil) together with its
spring and interlock pin (see illustration).
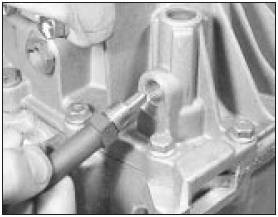
16.5 Fitting the selector shaft cap nut, spring and interlock pin
Apply sealer to the cap nut threads when refitting (see Specifications Chapter 7, Part A).
6 Manoeuvre the engine/transmission under the vehicle and attach the lifting hoist. Raise the engine/transmission carefully until the right-hand rear mounting can be engaged.
Refit the mounting nut and bolt but loosely only at this stage.
7 On pre-1986 models refit the front mounting and anti-roll bar support plates, then refit the left-hand front and rear mountings loosely only.
8 On 1986 models onwards, refit the transmission support crossmember.
9 Lower the hoist and let the power unit rest on its mountings. Ensure that none of the mountings are under strain, then tighten all the mounting nuts and bolts to the specified torque and remove the hoist.
10 The driveshafts and suspension arms should now be refitted using the procedure described in Chapter 8.
11 Refit the anti-roll bar clamps and mounting plates as applicable.
12 On cars equipped with an Anti-lock Braking System (ABS), refit the modulators, drivebelts and the pipe mounting bracket, then adjust the modulator drivebelt tension as described in Chapter 9.
13 Refit the engine splash shields.
14 On automatic transmission models reconnect the fluid cooler pipes, then reconnect and adjust the selector cable and downshift linkage as described in Chapter 7, Part B.
15 On manual transmission models reconnect and adjust the gearchange linkage using the procedure described in Chapter 7, Part A.
16 On RS Turbo models refer to Chapter 4, Part B and refit the turbocharger.
17 Refit the exhaust system and bolt the downpipe to the manifold.
18 Check that everything has been reconnected underneath, then lower the car to the ground.
19 Where applicable reconnect the clutch operating cable.
20 Reconnect the transmission earth strap and speedometer cable.
21 Reconnect the coolant and heater hoses.
22 Reconnect the accelerator cable and where fitted the choke cable and adjust as described in Chapter 4, Part A.
23 Reconnect all fuel and vacuum hoses and pipes with reference to the relevant Part of Chapter 4 where necessary. Use screw type hose clips to secure any hoses originally retained with crimped clips. On fuel-injection models use new sealing washers on each side of the banjo unions.
24 Reconnect all electrical wiring with reference to Chapters 3, 4, 5 and 12 and to any notes made during removal.
25 Fill up with engine oil, transmission oil or fluid and coolant, then reconnect the battery.
26 Refit the bonnet and the air cleaner or on RS Turbo models the inlet air duct.
27 Once the engine is running check the dwell angle, timing, idle speed and mixture as described in Chapter 1.
28 If a number of new internal components have been installed, run the vehicle at a restricted speed for the first few hundred miles to allow time for the new components to bed in. It is also recommended that with a new or rebuilt engine, the engine oil and filter are changed at the end of the running-in period.
See also:
Fuel injectors - removal and refitting
Note: Refer to the precautions at the end of
Section 1 before proceeding. New injector
seals will be required on refitting.
Removal
1 Disconnect the battery negative lead.
2 Depressurise the fuel ...
Bosch K-Jetronic and KE-Jetronic mechanical fuel injection
systems
The fuel system comprises a centrally mounted fuel tank,
electrically-operated fuel pump and Bosch K-Jetronic or KE-Jetronic continuous
injection system according to model. The system is used in c ...
Load apportioning valve (P100 models) - adjustment
Models before mid-April 1989
1 The vehicle must be unladen, at normal
kerb weight (a full tank of petrol, but no driver
or load).
2 With the vehicle standing on its roadwheels,
remove the spring ...
