Heater matrix - removal and refitting
Removal
1 With the heater removed from the vehicle
as previously described, extract the two
securing screws and slide the matrix out of
the heater casing.
2 If further dismantling is necessary, cut the casing seal at the casing joint, prise off any securing clips and separate the two halves of the casing.
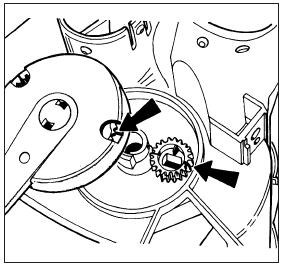
3 Remove the air flap valves. It should be noted that the lever for the air distribution valve can only be removed when the mark on the lever is in alignment with the one on the gearwheel (see illustration).

12.3 Air distribution valve lever and gear marks (arrowed)
4 If the heater matrix is leaking, it is best to obtain a new or reconditioned unit. Home repairs are seldom successful. A blocked matrix can sometimes be cleared using a cold water hose and reverse flushing, but avoid the use of searching chemical cleaners.
Refitting
5 Reassembly is a reversal of removal. Take
care not to damage the fins or tubes of the
matrix when inserting it into the casing. Refit
the heater with reference to Section 11.
See also:
Disc pads - inspection and renewal
Caution: Refer to the
precautions in Section 1.
Front disc pads
1 The disc pad friction material can be
inspected for wear without removing the
roadwheels. Working beneath the vehicle,
insert a ...
Distributorless Ignition System (DIS) components - removal and
refitting
Electronic modules
1 Refer to Section 6.
DIS coil
2 Refer to Section 4.
Engine speed sensor
Removal
3 Disconnect the battery negative lead.
4 Disconnect the sensor wiring plug (see
illustratio ...
Mixture adjustment check (Every 6000 miles (10 000 km) or 6 months)
Caution: Refer to the
precautions in Section 1,
Chapter 4, Part A or B (as
applicable), before proceeding.
Before carrying out any carburettor
adjustments, ensure that the ignition
timing and sp ...
