Cargo area (P100 models) - removal and refitting
Note: A suitable lifting crane and tackle will be required for this operation.
Removal
1 Disconnect the battery negative lead.
2 Remove the fuel filler cap, then drain the fuel tank.
3 Remove the two securing screws and detach the fuel filler pipe from the cargo area.
4 Disconnect the number plate lamp and the rear lamp wiring plugs, and release the wiring from the cargo area.
5 Disconnect the earth lead from the righthand front cargo area mounting bracket underneath the vehicle.
6 Working underneath the vehicle, remove the three Torx bolts on each side securing the cargo area to the chassis (see illustration).
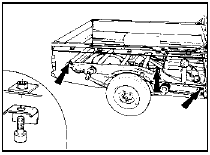
23.6 Cargo area-to-chassis Torx bolt locations (arrowed) - one side shown for
clarity
7 Make up a cradle to lift the cargo area from the chassis, using suitable ropes or chains attached to the tonneau tie-down points.
8 Position the crane with the lifting arm diagonally over the centre of the cargo area, and attach the cradle. Carefully lift the cargo area from the chassis. Note that the lip of the cargo area rear panel fits over the rear chassis crossmember, therefore the cargo area must be pulled rearwards as it is removed to disengage it from the crossmember.
Refitting
9 Refitting is a reversal of removal, but ensure
that the insulators are in place between the
cargo area and the chassis. Before finally
tightening the securing bolts, adjust the
position of the cargo area to give an equal
clearance on both sides of the vehicle
between the cab rear panel and the cargo
area front panel.
See also:
Brake pedal - removal, refitting and adjustment
Removal
1 Working within the vehicle, remove the
under-dash cover panel.
2 Extract the spring clip which connects the
pushrod to the arm of the brake pedal.
3 Extract the circlip from the end of ...
Steering tie-rod outer balljoint - renewal
1 If as the result of inspection the tie-rod
outer balljoints are found to be worn, remove
them as described in Section 20.
2 When the balljoint nuts are unscrewed, it is
sometimes found that the ...
Brake components check (Every 36 000 miles or 3 years)
1 Inspect the thickness of the friction linings
on the disc pads and brake shoes (as
described earlier in this Chapter) at the
intervals specified.
2 The rigid and flexible hydraulic pipes and
ho ...
