Rear tie-bar (Saloon and Estate models) - removal and refitting
Removal
1 Before attempting to remove a tie-bar, note
the location of all washers and bushes. These
control the rear wheel alignment and they
must be returned to their original locations.
2 Raise the rear of the vehicle and support it with stands (see “Jacking and Vehicle Support”).
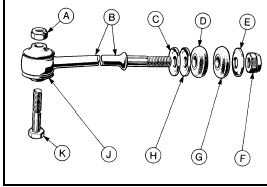
3 Unscrew and remove the pivot bolt from the eye at the front end of the tie-bar (see illustration).

12.3 Exploded view of the rear tie-bar mountings - Saloon and Estate models
A Nut
B Tie-bar
C Washer (additionalwashers
may be fitted)
D Bush
E Washer
F Nut
G Bush
H Washer (additional washers
may be fitted)
J Bush
K Pivot bolt
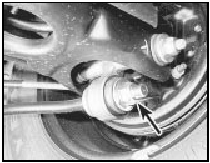
4 Unscrew the nut from the rear end of the tie-bar, take off the washers and bushes as the tie-bar is withdrawn and keep them in strict sequence for refitting (see illustration).

12.4 Tie-bar-to-stub axle carrier retaining nut (arrowed) - Saloon and Estate
models
Refitting 5 Renewal of the tie-bar flexible bush is quite easily carried out using sockets or distance pieces and applying pressure in the jaws of a vice.
6 Refit the tie-bar by reversing the removal operations.
See also:
Seat belts - removal and refitting
Front belt - 3-door models
Note: Note the fitted sequence of any plates,
washers and spacers when unbolting the seat
belt anchors.
Removal
1 Slide the belt stalk cover upwards to
expose the anch ...
Crankshaft and bearings - examination and renovation
1 Examine the bearing surfaces of the
crankshaft for scratches or scoring and, using
a micrometer, check each journal and
crankpin for ovality. Where this is found to be
in excess of 0.0254 mm (0. ...
Knock sensor - removal and refitting
Removal
1 The knock sensor is screwed into the
cylinder block, near the oil filter (see
illustration).
15.1 Knock sensor location - 1.4 CFI engine
A Knock sensor
B Wiring plug
C Securing bolt ...
