Rear anti-roll bar (Saloon and Estate models) - removal and refitting
Removal
1 Slacken the left-hand roadwheel bolts, raise
and support the rear of the car on stands (see
“Jacking and Vehicle Support”). Remove the
roadwheel.
2 Lever the shackles from the right and lefthand suspension lower arms (see illustration).
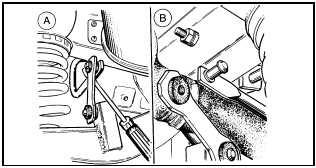
18.2 Disconnecting the rear anti-roll bar shackles - Saloon and Estate models
A Left-hand side B Right-hand side
3 Unbolt the anti-roll bar from the underbody, carefully noting the relative fixing locations.
4 Release the fuel lines from their securing clips. Support the fuel tank and remove the three tank mounting bolts. Carefully lower the tank on its support (see illustration).
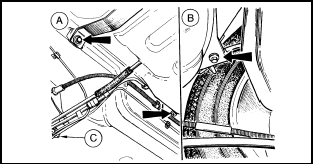
18.4 Fuel tank attachment details
A Mounting bolts (arrowed) B Mounting bolt (arrowed) C Fuel line clips
5 Withdraw the anti-roll bar from the left-hand side of the vehicle.
6 To remove the rubber bushes from the antiroll bar simply prise open the bush retainers with a screwdriver. Press the retainers together so that the fixing holes are in line when refitting.
Refitting
7 Refitting is a reversal of removal. The fuel
tank must be bolted in position before
securing the anti-roll bar. Ensure that the
underbody fixings are refitted in their original
locations.
8 Lubricate the shackle bushes with soap solution before reconnecting them to the lower arms.
See also:
Switches - removal and refitting
General
1 Disconnect the battery negative terminal
before removing any switches.
Pre-1986 models
Wiper delay switch
2 Remove the switch knob and the bezel nut.
3 Withdraw the switch through the ...
Rear shock absorber - removal and refitting
Saloon and Hatchback models
1 With the weight of the vehicle resting on the
roadwheels, work under the vehicle to
unscrew and remove the shock absorber
lower mounting bolt and nut from the relevan ...
Locks and Security
KEYS
The key operates all locks on your vehicle. In case of loss, replacement
keys are available from your dealer.
You should always carry a second key with you in a safe place in case
you requi ...
