Exterior mirror - removal and refitting
Without remote control
Removal
1 Using a screwdriver, prise off the triangular
trim panel from inside the mirror mounting
position.
2 Unscrew the three screws and withdraw the mirror.
Refitting
3 Refitting is a reversal of removal.
With remote control
Removal
4 Two types of remote control mirror are used
on Escort models. On the original version, a
special wrench is needed to unscrew the
mirror actuator bezel, although a C-spanner
may serve as a substitute. Once the bezel is
removed the mirror is removed as for the nonremote
control type.
5 On later versions extract the retaining circlip and pull off the remote control handle (see illustrations).
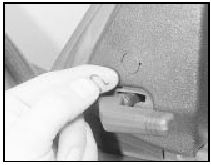
19.5a Remote control mirror handle circlip
19.5b Removing the remote control handle
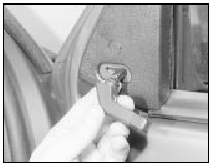
6 Extract the trim cover, undo the screw and remove the triangular trim panel (see illustrations).
19.6a Extract the trim cover and undo the screw . . .
19.6b . . . then remove the trim panel
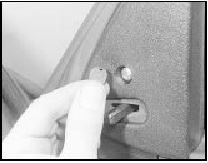
7 Undo the three screws and remove the mirror (see illustration).
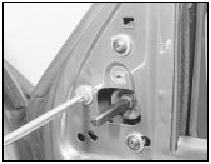
19.7 Removing the door mirror retaining screws
Refitting 8 Refitting is a reversal of removal.
Electrically-operated mirrors
Removal
9 Initially disconnect the battery earth lead or
remove the heated window fuse from the
fusebox.
10 Remove the door trim panel as described in Section 11 and disconnect the wiring multiplug.
The mirror is then removed in the same way as the non-remote control type.
Refitting
11 Refitting is a reversal of removal, but
check the operation of the mirror before finally
refitting the door trim panel.
Mirror glass renewal
Removal
12 On “high specification” models with fixed
(ie not remote control) mirrors, lever the glass
assembly outwards to disengage it from the
balljoint on the mirror glass mounting.
13 On “low specification” models with fixed (ie not remote control) mirrors, unclip the cover, then remove the securing screw and withdraw the glass assembly.
14 On models with remote control mirrors, insert a thin screwdriver through the hole in the bottom of the mirror assembly, and whilst supporting the glass, move the tang in the direction of the door to release the locking ring.
Refitting
15 On “high specification” models with fixed
mirrors, carefully push the glass into position,
ensuring that the balljoint engages securely.
16 On “low specification” models with fixed mirrors, secure the glass with the screw, and refit the cover.
17 On models with remote control mirrors, ensure that the locking ring is in place, then carefully push the glass into position.
See also:
Oil seals - renewal
Camshaft oil seal
Note: Thread locking compound will be
required to coat the camshaft sprocket bolt on
refitting.
1 Disconnect the battery negative lead.
2 Release the timing belt from the camsha ...
Battery - removal and refitting
Note: Refer to the precautions at the end of
Section 1 before proceeding.
Removal
1 The battery is located on the left-hand side
of the engine compartment on a bulkhead
platform.
2 Disconnect th ...
Loudspeakers - removal and refitting
Facia mounted loudspeaker
Removal
1 Carefully prise up the speaker grille using a
small screwdriver. Lift it from the facia.
2 Extract the speaker mounting screws which
are now exposed.
3 Lift t ...
