Door window regulator - removal and refitting
Removal
1 Remove the door inner trim panel.
2 Where necessary for improved access, peel back the waterproof plastic sheet from the door.
3 Lower the window until the lower support channel is visible through the lower door aperture. Prise the regulator arms from the sockets in the support channel, then lower the window to the bottom of the door (see illustration).
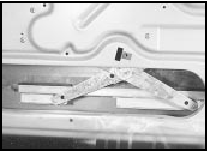
28.3 Front door window lower support channel and regulator arms
4 Drill out the four rivets securing the regulator assembly to the inner door skin, and if working on a front door, drill out the two rivets securing the regulator guide (see illustration).
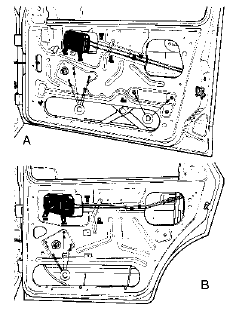
28.4 Door window regulator fixings
A Front door
B Rear door
C Regulator assembly securing rivets
D Regulator guide rivets
5 On models with electric windows, disconnect the motor wiring plug after disconnecting the battery negative lead.
Removal and refitting of the motor is described in Chapter 13.
6 Withdraw the regulator assembly through the lower door aperture.
Refitting
7 Refitting is a reversal of removal, but fit new
rivets, using a hand riveter.
See also:
Brake components check (Every 36 000 miles or 3 years)
1 Inspect the thickness of the friction linings
on the disc pads and brake shoes (as
described earlier in this Chapter) at the
intervals specified.
2 The rigid and flexible hydraulic pipes and
ho ...
Getting roadside assistance
To fully assist you should you have a vehicle concern, Ford Motor
Company offers a complimentary roadside assistance program. This
program is separate from the New Vehicle Limited Warranty. The serv ...
Washer nozzles - removal and refitting
Windscreen and rear window
washers
1 To remove a nozzle, carefully prise it from
its location using a thin-bladed screwdriver.
Disconnect the washer hose and withdraw the
nozzle.
2 To refit, rec ...
