ESC Hybrid system components - removal and refitting
Note: Procedures for removal and refitting of the ignition system components and electronic module are given elsewhere in the relevant Sections of this Chapter.
1 Disconnect the battery negative lead.
Crankshaft speed/position sensor 2 The sensor is mounted in a bracket on the timing cover.
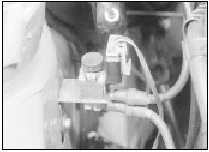
3 Disconnect the sensor wiring plug by pulling on the plug, not the wiring (see illustration).
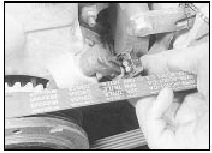
20.3 Disconnecting crankshaft speed/position sensor wiring plug - ESC Hybrid
system
4 Slacken the sensor clamping screw and slide the sensor from its bracket.
5 Refitting is a reversal of removal, but the clearance between the sensor and the toothed wheel on the crankshaft must be set at 1.0 mm (0.04 in). This can be achieved by inserting a suitable length of wire or rod with a diameter of 1.0 mm (0.04 in) between the sensor and the toothed wheel (see illustration).
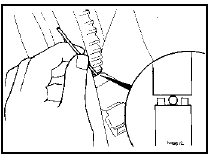
20.5 Setting the gap between the crankshaft speed/position sensor and the
crankshaft toothed wheel - ESC Hybrid system
Do not overtighten the clamping screw, as damage to the sensor may result.
Engine coolant temperature
sensor
6 The sensor is located in the side of the inlet
manifold (see illustration).
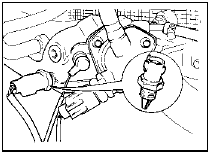
20.6 Engine coolant temperature sensor location - ESC Hybrid system
7 Partially drain the cooling system.
8 Disconnect the sensor wiring plug by pulling on the plug, not the wiring.
9 Unscrew the sensor from the inlet manifold and remove it.
10 Refitting is a reversal of removal. Fill the cooling system.
Air charge temperature sensor 11 The sensor is located in the base of the air cleaner.
12 Remove the air cleaner.
13 Disconnect the sensor wiring plug by pulling on the plug, not the wiring (see illustration).
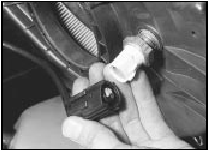
20.13 Disconnecting air charge temperature sensor wiring plug - ESC Hybrid
system
14 Unscrew the sensor from the air cleaner using a suitable spanner.
15 Refitting is a reversal of removal. Refit the air cleaner. Ensure that the vacuum hose is securely connected.
Electric choke heater
16 The electric choke heater is an integral
part of the automatic choke housing on the
carburettor. Removal and refitting of the
choke housing is covered in Chapter 4.
17 The operation of the electric choke heater relay can be checked by starting the engine from cold, and placing a finger on the relay (see illustration). It should be possible to feel the relay switching on and off. If this is not the case, renew the relay.
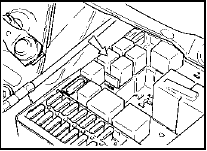
20.17 Electric choke heater relay location (arrowed) in main fusebox - ESC
Hybrid system
Throttle damper control solenoid 18 The solenoid is on the right-hand side of the engine compartment (see illustration).
20.18 Throttle damper control solenoid - ESC Hybrid system
19 Disconnect the solenoid wiring plug by pulling on the plug, not the wiring.
20 Disconnect the two vacuum pipes from the solenoid, noting their locations for use when refitting.
21 Remove the securing screw and withdraw the solenoid from the body panel.
22 Refitting is a reversal of removal, but note that the locating lug on the solenoid bracket should engage with the body panel, and make sure that the vacuum pipes are correctly connected.
Throttle damper
23 Remove the air cleaner.
24 Disconnect the vacuum pipe from the throttle damper.
25 Remove the two securing screws and detach the throttle damper and bracket assembly from the carburettor (see illustration).
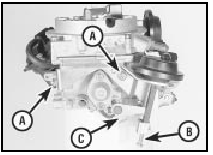
20.25 Throttle damper assembly - ESC Hybrid system
A Securing screws
B Adjusting screw
C Throttle lever
26 Commence refitting by securing the throttle damper and bracket assembly to the carburettor with the two screws. Ensure that the throttle lever is correctly positioned in the slot in the throttle damper actuating arm.
27 Reconnect the vacuum pipe to the throttle damper.
28 Reconnect the air cleaner vacuum hose to the inlet manifold, and reconnect the air change temperature sensor wiring plug, then place the air cleaner to one side to allow access to the throttle damper.
29 Reconnect the battery negative lead.
30 Connect a tachometer to the engine in accordance with the manufacturer’s instructions.
31 Start the engine, then check and if necessary adjust the idle speed and mixture.
32 Earth the “service adjustment” lead, located in the battery negative wiring loom (see illustration), for a minimum of 10 seconds. The throttle damper actuating arm should move to the fully retracted position, raising the engine speed.
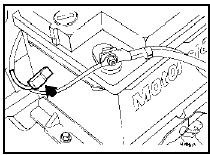
20.32 Service adjustment lead location (arrowed) - ESC Hybrid system
33 The engine speed should stabilise at 1700 ± 100 rpm. If adjustment is necessary, turn the adjusting screw on the end of the throttle damper actuating arm to give the correct speed. Turn the screw clockwise to increase the engine speed, or anti-clockwise to reduce the engine speed.
34 On completion of adjustment, stop the engine and disconnect the tachometer.
35 Where necessary, ensure that any tamperproof seals are refitted, then refit the air cleaner, ensuring that the vacuum hose is securely connected. Isolate the “service adjustment” lead.
36 Start the engine and check that normal idle speed is resumed, then stop the engine.
See also:
Bonnet lock - removal and refitting
Removal
1 Extract the three securing screws from the
lock and lower it until the cable can be
disconnected.
2 Withdraw the lock from below the top rail.
Refitting
3 Refit by reversing the remova ...
Door window - removal and refitting
Front door
1 Remove the door inner trim panel.
2 Where necessary for access, peel back the
waterproof plastic sheet from the door.
3 Remove the door mirror.
4 Remove the window channel extension
...
Cylinder head - removal and refitting (engine in vehicle)
Note: Refer to the note at the beginning of
Section 20 before proceeding.
1.8 litre (R2A type)
Removal
1 Disconnect the battery negative lead.
2 Drain the cooling system.
3 Disconnect the heater ...
