
Front seat air cushion assembly - removal and refitting
Complete assembly - removal and
refitting
1 Remove the seat.
2 Straighten the seat back cover retaining tangs, and pull the cover upwards to expose the air cushion.
3 Cut through the four securing rings (see illustration) and remove the two screws securing the metal air tube to the side of the seat, then withdraw the assembly from the seat frame.
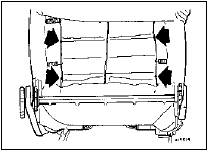
49.3 Front seat air cushion securing rings (arrowed)
4 Refitting is a reversal of removal, using new cushion securing rings.
Air inflator ball - renewal 5 Remove the seat.
6 Remove the two screws securing the metal air tube to the side of the seat (see illustration), then cut through the plastic hose as close to the end of the metal tube as possible. Discard the old tube and the inflator ball.
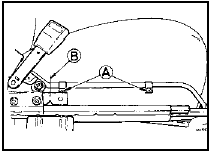
49.6 Front seat air cushion tube and inflator ball
A Air tube securing screws B Hose cutting point
7 Fit a new hose clamp over the plastic hose, and warm the end of the hose in hot water until it is pliable. Push the metal tube into the plastic hose, ensuring an overlap of at least 20.0 mm (0.8 in).
8 Crimp the new clamp onto the hose to ensure an airtight seal.
9 Refit the two screws securing the tube to the side of the seat.
10 Refit the seat.
See also:
Diagram 2a: 1986-on Lighting all models
Diagram 2a: 1986-on Lighting all models ...
Air conditioner refridgerant charge check (Every 12 000 miles (20 000 km) or
12 months)
1 If applicable, remove the radiator grille
being careful not to damage the condenser
fins.
2 Check the refrigerant charge as follows.
The engine should be cold and the ambient
temperature should ...
Oil pump - dismantling, inspection and reassembly
Note: A new pressure relief valve plug and
pick-up tube gasket will be required for
reassembly.
Dismantling
1 If oil pump wear is suspected, check the
cost and availability of new parts and the c ...
