Auxiliary warning system components - location, testing, removal and refitting
Location
1 The AWS control unit, and (when fitted) the
bulb failure monitor, are located behind the
glovebox on models up to 1987.
2 On models from 1987, the control and bulb failure modules are located behind the driver’s side footwell trim panel.
Testing
3 Thorough testing and fault finding should
be left to a Ford dealer or other electrical
specialist, having test equipment. Unskilled or
uninformed testing may cause damage.
4 Investigation of malfunctions should begin by checking that all wiring is intact and securely connected. If checking wires or sensors for continuity, always disconnect the control unit and/or bulb failure monitor before so doing, otherwise damage may be caused.
5 Note that false oil level readings can result if the car is parked on a slope. False bulb failure warnings may occur if incorrect wattage bulbs are fitted.
Removal and refitting
6 Disconnect the battery negative lead.
Warning lamp bulbs
7 Remove the single screw from the top edge
of the facia panel in which the warning lamps
are housed, then withdraw the facia panel
(see illustration).
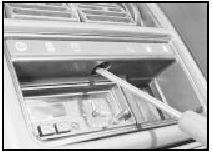
23.7 Remove the screw from the warning lamp facia panel
8 Twist the relevant bulbholder through 90º to remove it from the rear of the facia panel. The bulb is integral with the bulbholder and must be renewed as a unit (see illustration).
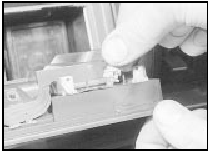
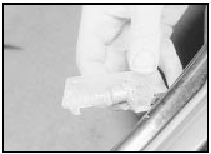
23.8 Removing an auxiliary warning lamp bulb
9 Refitting is a reversal of removal.
Graphic display unit and bulbs 10 Remove the clock or trip computer.
11 Remove the display unit retaining screw and the retainer, then pull the unit forwards and disconnect the wiring plug using a thinbladed screwdriver (see illustrations).
23.11a Removing the graphic display unit retaining screw
23.11b Disconnecting the wiring plug from the graphic display unit
12 To renew a bulb, remove the two securing screws and pull the circuit board from the back of the unit to reveal the bulbs. The bulbs are a push-fit.
13 Refitting is a reversal of removal.
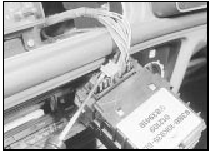
Control unit and bulb failure monitor 14 Unclip the trim panel from the lower edge of the passenger side lower facia panel.
15 On models up to 1987, pull off the two clips to release the control unit/bulb failure monitor mounting bracket. Depress the retaining tab and disconnect the relevant wiring plug, then remove the two securing screws and withdraw the control unit/bulb failure monitor (see illustration).
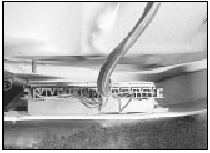
23.15 Auxiliary warning system control unit location
16 On models from 1987, release the retaining tang and carefully slide the control unit/bulb failure monitor downwards. Depress the retaining tab and disconnect the relevant wiring plug, then withdraw the control unit/bulb failure monitor.
17 Refitting is a reversal of removal. Note that when both a control unit and bulb failure monitor are fitted, the control unit wiring plug is coloured brown, and the bulb failure monitor wiring plug is coloured green.
Ice warning sender
18 This sender is located beneath the front
panel on the right-hand side of the vehicle.
19 Where necessary, for improved access remove the horn.
20 Depress the two retaining tangs, disconnect the wiring plug and withdraw the sender unit from the slot in the front panel.
21 Refitting is a reversal of removal.
Door/tailgate/boot lid ajar switches 22 Remove the relevant lock.
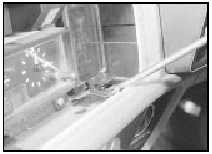
23 Pull the switch from its location in the lock body, disconnect the wiring plug (if not already done) and withdraw the switch (see illustration).
23.23 Door lock and door ajar switch
24 Refitting is a reversal of removal.
Low coolant level sensor 25 Refer to Chapter 3.
Low washer fluid level switch 26 Syphon out the contents of the reservoir, then prise the switch from its grommet using a thin-bladed screwdriver. Disconnect the wiring plug.
27 Refitting is a reversal of removal, using a new grommet if necessary. Use a little liquid detergent as a lubricant.
28 On completion, refill the reservoir.
Low fuel level switch
29 The switch is integral with the fuel level
sender unit. Details of fuel level sender unit
removal and refitting are given in Chapter 4.
Low oil level switch
30 The switch is integral with the oil level
dipstick. To remove, simply withdraw the
dipstick from its tube and disconnect the
wiring plug.
31 Refitting is a reversal of removal.
“Lights-on” warning module - renewal
1 Remove the instrument panel.
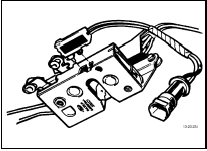
2 Unclip the direction indicator relay from the steering column support bracket (see illustration).
24.2 “Lights-on” warning module location
A “Lights-on” warning module B Direction indicator relay C “Lights-on” warning module wiring plug
3 Unclip the “lights-on” warning module from the steering column support bracket, disconnect the wiring plug and remove the module.
4 Refitting is a reversal of removal.
Courtesy lamp and luggage compartment lamp - renewal
1 Disconnect the battery negative lead.
2 To remove a lamp, simply prise it from its location, using a thin-bladed screwdriver, and disconnect the wiring (see illustrations).
25.2a Removing a courtesy lamp
25.2b Removing a luggage compartment lamp
When working on an overhead consolemounted courtesy lamp, disconnect the wiring between the map reading lamps and the courtesy lamp before removing the courtesy lamp.
3 Refitting is a reversal of removal.
Map reading lamp - removal and refitting
1 Disconnect the battery negative lead.
2 Remove the courtesy lamp and disconnect the map reading lamp wires.
3 Push the map reading lamp out of its location by inserting a finger through the courtesy lamp aperture.
4 Refitting is a reversal of removal.
See also:
Major body damage - repair
Where serious damage has occurred or
large areas need renewal due to neglect, it
means that completely new sections or panels
will need welding in, and this is best left to
professionals. If the d ...
Front suspension crossmember - removal and refitting
Removal
1 Remove the steering gear.
2 Support the engine with a jack and
interposed block of wood under the sump.
3 Unscrew and remove the engine mounting
nuts from the top of the mountings in th ...
Auxiliary air device - removal and refitting
K-Jetronic system
Removal
1 Disconnect the battery earth lead.
2 Disconnect the wiring multi-plug and the
two air hoses from the device which is located
beneath the cold start valve (see illustra ...
