Fuel tank - removal and refitting
Note: Refer to the warning at the end of Section 1 before proceeding.
Removal
1 The fuel tank will normally only need to be
removed if it is severely contaminated with
sediment or other substance, or requires
repair.
2 As there is no drain plug incorporated in the tank, the best time to remove it is when it is nearly empty. If this is not possible, syphon as much fuel as possible from the tank into a container which can be sealed, but before doing so, observe the following precautions: a) Disconnect the battery, negative lead first.
b) Do not smoke or bring naked lights near.
c) Avoid placing the vehicle over an inspection pit as the fuel vapour is heavier than air.
3 With the rear of the vehicle raised and supported securely, disconnect the flexible hose connection between the sections of rigid fuel line at the front face of the tank (see illustration). On some models dual pipelines are used, the second one being a fuel return line which returns excess fuel from the carburettor.
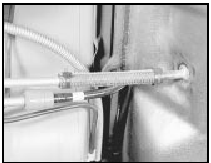
6.3 Fuel tank flexible hose connections at front of tank
4 Disconnect the electrical leads from the tank sender unit.
5 Brush away all adhering dirt and disconnect the tank filler pipe and vent pipes from the tank pipe stubs (see illustration).
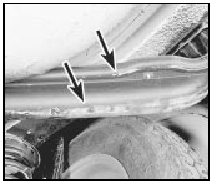
6.5 Fuel tank filler and vent pipe locations (arrowed)
Additionally, on 1986 models onwards, disconnect the filler vent pipe.
6 Support the tank and unscrew the bolts from the support straps (see illustration).
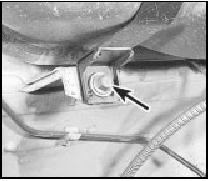
6.6 Fuel tank support strap bolt (arrowed)
7 Lower the tank until the fuel hoses can be detached from the sender unit and from their retaining clips. On 1986 models onwards disconnect the small bore vent pipe located on the top face of the tank (see illustration).
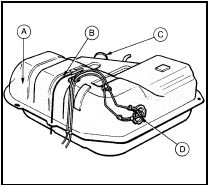
6.7 Fuel tank assembly
A Fuel tank
B Vent pipe
C Fuel filler stub
D Fuel gauge sender unit
Lower the tank fully and remove it from under the car.
Refitting
8 If the tank is to be cleaned out, repaired or
renewed, remove the sender unit. To do this,
unscrew the unit in an anti-clockwise direction
using the special tool (23-014) or a suitable
lever engaged behind the tabs.
9 If the tank contains sediment or water, clean it out by shaking vigorously using paraffin as a solvent. After several changes, rinse out finally with petrol.
10 If the tank is leaking, leave repair to a specialist company. Attempting to weld or solder the tank without it first having been steamed out for several hours is extremely dangerous.
11 Refit the sender unit using a new sealing ring.
12 Refit the tank into the vehicle by reversing the removal operations. Check all connections for leaks after the tank has been partly filled with fuel.
See also:
Starter motor brushes - renewal
1 Starter motor brush renewal is a relatively
difficult procedure, requiring skill in the use of
a soldering iron. It should also be borne in
mind that if the starter motor has been in
service lon ...
Front disc pads - renewal
Warning: Renew both sets of
front brake pads at the same time
- never renew the pads on only
one wheel, as uneven braking
may result. Note that the dust created by
wear of the pads may contain as ...
Exhaust manifold nut check - RS Turbo models (Every 6000 miles
or 6 months)
Check the tightness of the exhaust
manifold securing nuts using a torque wrench. ...
