
Folding roof (Cabriolet models) - removal and refitting
Removal
1 Remove the rear side, wheel arch and roof
stowage compartment trim panels.
2 Disconnect the heated rear window wiring and pull it from the weatherstrip.
3 Release the roof front locking catches.
4 Unscrew the nuts and remove the rear window frame guides.
5 Remove the protection cover screw and the tensioning screw from each side (see illustration).
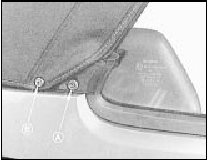
22.5 Protection cover screw (A) and tensioning screw (B) - Cabriolet models
6 Unscrew the nuts at both tensioning cable blocks.
7 Pull the roof and cable from the rail and release the cable.
8 With the roof frame upright, unbolt the strap retaining brackets.
9 Remove the headlining wire screw and unhook the wire.
10 Disconnect the gas struts.
11 Lower the front of the roof then unscrew the three mounting bolts on each side.
12 Lift the complete folding roof from the car.
Refitting
13 Refitting is a reversal of removal, but do
not tighten the mounting bolts or tensioning
block nuts until the front of the roof is locked
and the rear beading is in the rail (see
illustration). It may be necessary to use a
tamping tool to ensure that the tensioning
cable is fully inserted in the rail. A little sealant
should be applied at the points where the
cable passes through the covering.
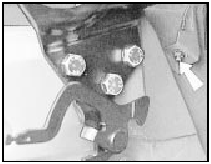
22.13 Cable tensioning block nut (arrowed) - Cabriolet models
See also:
Engine/transmission - reconnection and installation
1 This is a direct reversal of removal and
separation from the transmission. Take care
not to damage the radiator or front wings
during installation.
Reconnection
2 Reconnection of the engine and ...
AM/FM radio with compact disc player
Volume/power control
Ensure that the ignition switch is in
the ACC or ON position.
Press the control to turn the audio
system on. Turn the control to raise
or lower the volume.
Press the ...
Inner gutter weatherstrip (Saloon, Hatchback and Estate models) - removal
and refitting
Removal
1 Open both the front and rear doors to
expose the relevant weatherstrip.
2 Carefully pull the weatherstrip from the
base of the front pillar, taking care to release
the flap which is stu ...
