Choke control cable - removal, refitting and adjustment
Pre-1986 models
Removal
1 Disconnect the battery earth lead.
2 For improved access, remove the air cleaner unit (Section 2).
3 At the carburettor end of the cable, loosen the cable clamp bolt, detach the outer cable securing clip at the choke control bracket and disconnect the cable.
4 Working inside the car, remove the coin box from the lower facia panel (beneath the choke control knob) (see illustration).
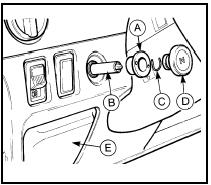
9.4 Choke cable attachments at facia pre-1986 models
A Bezel
B Switch lever
C Knob retaining clip
D Knob
E Coin box
5 Remove the clip retaining the cable control knob and withdraw the knob from the switch lever.
6 Remove the control switch bezel and then, reaching up underneath the facia withdraw the switch from the underside of the panel (through the coin box aperture).
7 The choke cable can now be pulled through the engine bulkhead and the switch removed.
Refitting
8 Refitting is the reversal of removal, but in
conjunction with the following adjustment
procedure.
Adjustment
9 From either a flat strip of metal or preferably
metal tubing make up a spacer as shown (see
illustration).
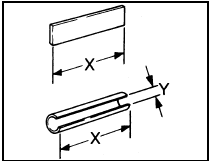
9.9 Choke cable adjustment spacer dimensions - pre-1986 models
X = 37.0 to 37.5 mm
Y = 12.0 mm minimum
10 Pull out the choke and locate the spacer behind the choke knob. Ensure that the spacer remains in position throughout the procedure (see illustration).
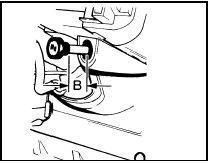
9.10 Choke knob pulled out for adjustment with spacer (B) in position -
pre-1986 models
11 At the carburettor end, mark the inner cable at a point 22 mm (0.86 in) from the end using pencil or tape (see illustration). On some cables the cable may be kinked for reference at this point or a ferrule may be fitted.
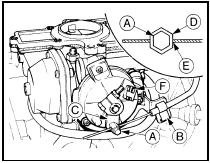
9.11 Choke cable adjustment at carburettor - pre-1986 models
A Cable clamp bolt
B Outer cable retaining clip
C Operating lever
D Cable clamp
E Point 22 mm from cable end
F Full choke stop
12 Insert the cable in the cable clamp until the mark or ferrule is against the edge of the clamp. Tighten the clamp bolt.
13 Pull the outer cable so that the operating lever on the choke is against the “full choke” stop on the housing. Secure the outer cable to its bracket, in this position, using the retaining clip.
14 Remove the spacer and check that the operating lever contacts the “choke off” stop and “full choke” stop on the housing when the choke knob is pushed in and pulled out respectively. On completion of the adjustment ensure that there is a small clearance between the lever and the “off stop” when the choke knob is pushed in.
1986 models onwards
Removal
15 Disconnect the battery earth lead.
16 Remove the air cleaner as described in Section 2.
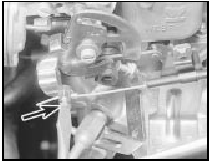
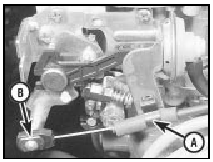
17 At the carburettor end of the cable, loosen the cable clamp bolt, detach the outer cable securing clip at the choke control bracket and disconnect the cable. On 1.1 and 1.3 litre HCS engine models, release the outer cable securing clamp and unhook the cable end fitting from the choke lever (see illustrations).
9.17a Releasing the choke cable clamp bolt (arrowed)
9.17b Choke cable outer cable clamp (A) and end fitting (B) on 1.3 litre HCS
engine
18 Working inside the car remove the steering column shrouds for access to the cable.
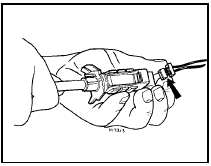
19 From behind the facia disconnect the warning light wire from the choke control assembly (see illustration).
9.19 Removing choke assembly warning light wire - 1986 models onwards
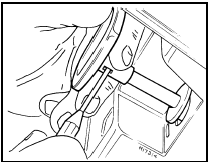
20 Using a small probe, depress the locking pin on the underside of the choke knob collar and remove the knob (see illustration).
9.20 Using a small probe to release choke knob locking pin - 1986 models
onwards
21 Unscrew the choke control retaining collar and withdraw the cable from under the facia.
Pull the cable through the bulkhead and remove it from inside the car.
Refitting
22 Refitting is the reversal of removal, but in
conjunction with the following adjustment
procedure.
Adjustment
23 With the cable in position in the facia and
routed through the bulkhead, push the choke
knob fully in and engage the inner cable end
with the clamp at the carburettor.
24 Pull the cable through the clamp up to the cable ferrule, then tighten the clamp bolt.
25 Pull out the choke knob to the full choke position and also hold the choke lever on the carburettor in the full choke position. Secure the cable to the bracket with the clip.
26 Check that with the knob pulled fully out the choke lever contacts the full choke stop on the carburettor and returns fully to the choke off position when the knob is pushed in. On models fitted with the Ford VV carburettor, ensure that there is a small clearance between the choke lever and the choke off stop when the choke knob is pushed fully in.
See also:
Exhaust system - renewal
1 The layout of the exhaust system varies
considerably according to model and engine.
All except the RS Turbo versions can be
renewed in sections; coupling sleeves are
supplied, enabling an old se ...
Headlamp wiper motor - removal and refitting
Note: On vehicles fitted with foglamps, the
headlamp unit must be removed when the righthand
headlamp wiper motor is to be removed.
Removal
1 Disconnect the battery negative lead.
2 Disconnect th ...
Exhaust system check (Every 12 000 miles or 12 months)
With the vehicle raised on a hoist or
supported on axle stands (see “Jacking and
Vehicle Support”), check the exhaust system
for signs of leaks, corrosion or damage and
check the rubber mountings ...
