Fuel accumulator - removal and refitting
Note: Refer to the precautions at the end of Section 1 before proceeding.
Pre-1986 models
Removal
1 The fuel accumulator is mounted adjacent
to the fuel pump, above the rear left-hand
suspension arm.
2 Disconnect the battery negative lead.
3 Raise the rear of the car and support it on axle-stands (see “Jacking and Vehicle Support”).
4 Relieve the system pressure by slowly loosening the fuel feed pipe at the warm-up regulator. Absorb fuel leakage in a cloth.
5 Disconnect the fuel pipes from the fuel accumulator and catch the small quantity of fuel which will be released (see illustration).
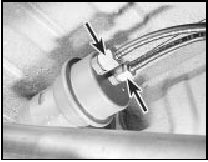
7.5 Fuel pipe connections (arrowed) at the underbody mounted fuel accumulator
6 Remove the clamp screw and remove the accumulator.
Refitting
7 Refitting is a reversal of removal. Check for
leaks on completion (with the engine
restarted).
1986 models onwards
Removal
8 On later models with K-Jetronic and KEJetronic
systems the fuel accumulator is
located in the engine compartment behind the
fuel distributor.
9 Disconnect the battery negative lead.
10 For access remove the air cleaner as described in Section 2.
11 Relieve the system pressure by slowly loosening the cold start valve union on the top of the fuel distributor (see illustration 6.4).
Absorb fuel leakage in a cloth.
12 Disconnect the fuel pipes from the accumulator and catch the small quantity of fuel which will be released (see illustration).
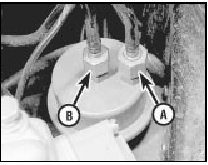
7.12 Fuel inlet pipe (A) and outlet pipe (B) at the engine compartment
mounted fuel accumulator
13 Remove the clamp screw and remove the accumulator.
Refitting
14 Refitting is a reversal of removal. Check
for leaks on completion (with the engine
restarted).
See also:
Heated rear window aerial amplifier - removal and refitting
Removal
1 On some 1986 models onwards the radio
aerial is incorporated in the heated rear
window element, and to assist reception an
amplifier is fitted. This is located in the tailgate
adjacent ...
Fuses, relays and circuit breakers - general information
Pre-1986 models
1 The fuses and most of the relays are
located in a plastic box attached to the
bulkhead on the driver’s side of the engine
compartment.
2 The fuses are numbered to identify the
...
Steering wheel - alignment
1 Owing to the fact that the steering wheel is
located on a hexagon shaped steering shaft, it
may be difficult to obtain perfect steering wheel
alignment due to lack of fine adjustment.
2 It is th ...
