Cold start valve - removal and refitting
Note: Refer to the precautions at the end of Section 1 before proceeding.
K-Jetronic system
Removal
1 Disconnect the battery earth lead.
2 Detach the electrical wiring multi-plug from the valve (see illustration).
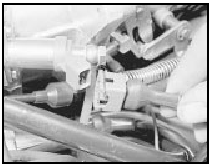
9.2 Disconnecting the cold start valve wiring multi-plug
3 Slowly unscrew and remove the fuel supply pipe banjo bolt. Take care on removal, as the system will be under pressure. Soak up fuel spillage with a cloth.
4 Unscrew and remove the two socket-head mounting bolts using an Allen key or Torx type key or socket bit on later models, and remove the valve.
Refitting
5 Refitting is a reversal of the removal
procedure. Do not overtighten the banjo bolt
or the washers may fracture (use a new one
each side of the union).
6 On completion restart the engine and check for signs of fuel leakage.
KE-Jetronic system
Removal
7 Disconnect the battery earth lead.
8 Disconnect the wiring multi-plug from the valve which is located underneath the throttle housing (see illustration).
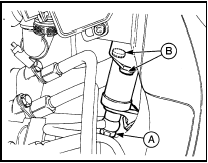
9.8 KE-Jetronic system cold start valve
location
A Fuel pipe union B Retaining bolts
9 Slowly unscrew and remove the fuel supply pipe banjo union. Take care on removal, as the system will be under pressure. Soak up fuel spillage with a cloth.
10 Unscrew and remove the two Torx type mounting bolts using a Torx key or socket bit.
Remove the valve from under the throttle housing.
Refitting
11 Refitting is a reversal of removal. Do not
overtighten the banjo bolt or the washers may
fracture (use a new one each side of the
union).
12 On completion restart the engine and check for leaks.
See also:
Exterior lamps - removal and refitting
Headlamp
Removal
1 On pre-1986 models, remove the radiator
grille as described in Chapter 11.
2 Working in the engine compartment,
disconnect the headlamp wiring multi-plug
and remove the sidela ...
Throttle body - removal and refitting
Note: A tachometer and an exhaust gas
analyser will be required to check the idle
mixture on completion. A new gasket must be
used when refitting the throttle body.
2.0 litre SOHC models
1 Discon ...
Pistons and connecting rods - removal and refitting
Note: New connecting rod bolts and a new oil
pick-up pipe gasket must be used on refitting.
Removal
1 Remove the sump and the cylinder head.
2 Unscrew the two securing bolts, and
remove the oil p ...
