Fuel pressure regulator - removal and refitting
Note: Refer to the precautions at the end of Section 1 before proceeding.
Removal
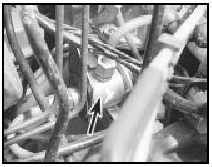
1 The fuel pressure regulator is only used on
KE-Jetronic systems and is located behind
the fuel distributor (see illustration).

13.1 KE-Jetronic fuel pressure regulator location (arrowed) behind fuel
distributor
2 Disconnect the battery negative lead.
3 Relieve the system pressure by slowly loosening the cold start valve union on the top of the fuel distributor (see illustration 6.4).
Absorb fuel leakage in a cloth.
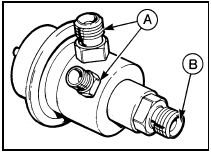
4 Place absorbent cloth beneath the regulator and undo the two fuel feed unions and the fuel return union. Note the pipe locations to ensure correct refitting.
5 Remove the securing tie and withdraw the regulator from its bracket.
Refitting
6 Refitting is a reversal of removal. Ensure
that all unions are correctly reconnected and
secure, and on completion check for fuel leaks
with the engine running (see illustration).

13.6 KE-Jetronic fuel pressure regulator pipe connections
A Fuel feed B Fuel return
5 Remove the securing tie and withdraw the regulator from its bracket.
Refitting
6 Refitting is a reversal of removal. Ensure
that all unions are correctly reconnected and
secure, and on completion check for fuel leaks
with the engine running (see illustration).
See also:
Integral heated rear window/radio aerial amplifier - removal and refitting
1 Disconnect the battery negative lead.
Saloon models
2 Remove both rear seat side cushions.
3 Remove the securing screws and withdraw
the rear parcel shelf.
4 Make a note of the wiring connectio ...
Engine/manual gearbox assembly - removal and separation
Note: A suitable hoist and lifting tackle will be
required for this operation.
1.8 litre (R2A type)
Removal
1 Proceed as described in Section 8,
paragraphs 1 to 15 inclusive.
2 Working inside th ...
Fluid reservoir (ABS) - removal and refitting
Note: New seals must be used between the
reservoir and the hydraulic unit on reassembly.
Caution: Refer to the
precautions in Section 1.
Removal
1 Disconnect the battery negative lead.
2 Depress ...
