Fuel-injection control module - removal and refitting
Removal
1 The fuel-injection control module is only
used on KE-Jetronic systems and is located in
the engine compartment behind the heater
plenum chamber and fan motor.
2 Disconnect the battery negative lead.
3 Remove the plenum chamber top cover rubber seal (see illustration).
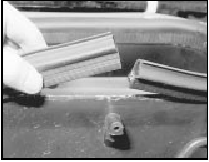
16.3 Remove the plenum chamber rubber seal
4 Release the five retaining clips and lift off the plenum chamber top cover (see illustrations).
16.4a Release the retaining clips . . .
16.4b . . . and lift off the plenum chamber top cover
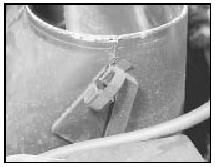
5 Undo the two nuts securing the heater fan motor assembly to the bulkhead. Lift the unit off the studs and place it on the engine, but avoid straining the wiring (see illustrations).
16.5a Heater fan motor retaining nut
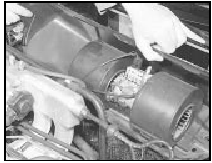
16.5b Removing the heater fan motor assembly . . .
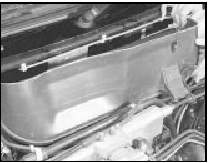
6 Disconnect the module wiring multi-plug, then undo the three screws and remove the unit from its location (see illustration).

16.6 . . . for access to the fuel-injection control module
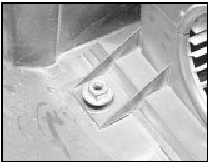
Refitting 7 Refitting is the reversal of removal. Take care not to trap the motor wiring when refitting the fan motor assembly and ensure that it is engaged in the slot provided in the housing (see illustration).
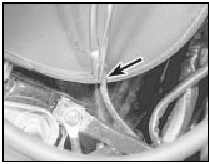
16.7 Fan motor wiring engaged in housing slot (arrowed)
See also:
Fuel injectors - removal and refitting
Note: Refer to the precautions at the end of
Section 1 before proceeding. New injector
seals will be required on refitting.
Removal
1 Disconnect the battery negative lead.
2 Depressurise the fuel ...
Temperature gauge sender removal and refitting
Removal
1 On SOHC models, the temperature gauge
sender is located on the front left-hand side of
the cylinder head, just in front of the inlet
manifold. On CVH models, the sender is
located on th ...
Rear suspension and axle assembly (P100 models) - removal and refitting
Note: All self-locking nuts and spring washers
must be renewed on reassembly.
Removal
1 Chock the front wheels, jack up the rear of
the vehicle and support on axle stands placed
under the side me ...
