Alternator brushes and regulator - renewal
Bosch alternator 1 With the alternator removed from the engine, clean the external surfaces free from dirt.
2 Extract the brush box/regulator screws from the rear cover and withdraw the brush box/regulator (see illustration). Check the brush length and, if less than the specified minimum, renew them.
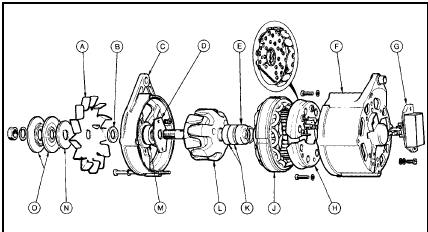
6.2 Exploded view of the Bosch G1 and K1 series alternators
A Fan
B Spacer
C Drive end housing
D Drive end bearing retaining plate
E Slip ring end bearing
F Slip ring end housing
G Brush box/regulator
H Rectifier diode pack
J Stator
K Slip rings
L Rotor
M Drive end bearing
N Spacer
O Pulley
3 Unsolder the brush wiring connectors and remove the brushes and the springs.
4 Refit by reversing the removal operations.
Lucas alternator
5 Proceed as described in paragraph 1.
6 Remove the alternator rear cover (see illustrations).
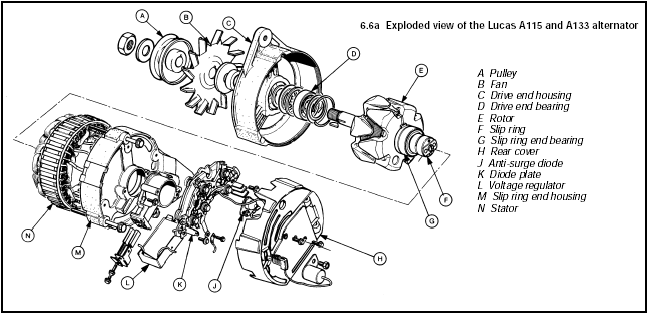
6.6a Exploded view of the Lucas A115 and A133 alternator
A Pulley
B Fan
C Drive end housing
D Drive end bearing
E Rotor
F Slip ring
G Slip ring end bearing
H Rear cover
J Anti-surge diode
K Diode plate
L Voltage regulator
M Slip ring end housing
N Stator
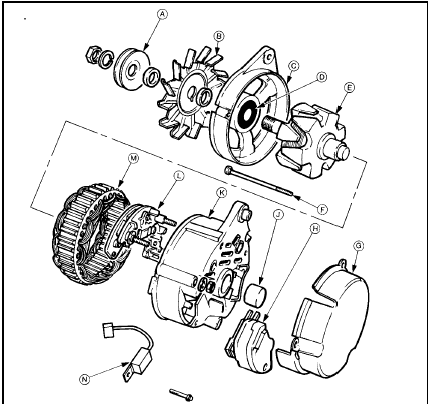
6.6b Exploded view of the Lucas A127 alternator
A Pulley
B Fan
C Drive end housing
D Drive end bearing
E Rotor
F Through-bolt
G Rear cover
H Brush box and regulator
J Slip ring end bearing
K Slip ring end housing
L Rectifier pack
M Stator
N Suppressor
7 Extract the brush box retaining screws and withdraw the brush assemblies from the brush box.
8 If the length of the brushes is less than the specified minimum, renew them. Refit by reversing the removal operations.
9 To remove the regulator, disconnect the wires from the unit and unscrew the retaining screw (A115 and A133 units only - three screws on A127 type).
10 Refit by reversing the removal operations, but check that the small plastic spacer and the connecting link are correctly located.
Motorola alternator
11 Proceed as described in paragraph 1.
12 Extract the two regulator securing screws, disconnect the two regulator leads and withdraw the unit (see illustration).
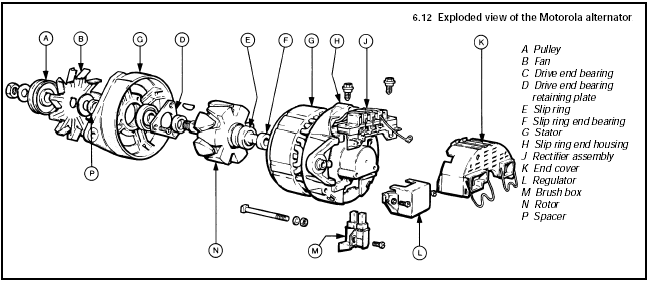
6.12 Exploded view of the Motorola alternator
A Pulley
B Fan
C Drive end bearing
D Drive end bearing
retaining plate
E Slip ring
F Slip ring end bearing
G Stator
H Slip ring end housing
J Rectifier assembly
K End cover
L Regulator
M Brush box
N Rotor
P Spacer
13 Extract the brush box retaining screw and pull and tilt the brush box from its location, taking care not to damage the brushes during the process.
14 If necessary, unsolder the brush connections.
15 Fit the new brushes by reversing the removal operations.
Mitsubishi alternator
16 Proceed as described in paragraph 1.
17 Undo the three housing through-bolts and remove the slip ring end housing. It may be necessary to apply heat from a high-power (200 watt) soldering iron to the centre of the end housing for a few minutes if the housing refuses to free from the rotor (see illustrations).
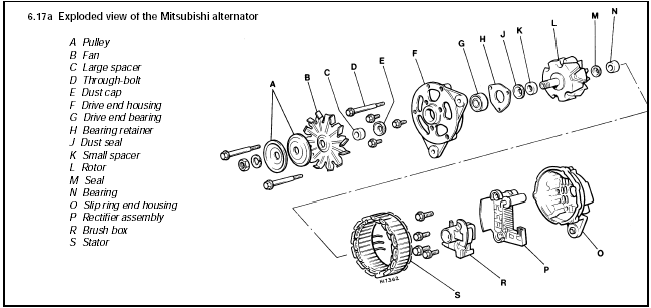
6.17a Exploded view of the Mitsubishi alternator
A Pulley
B Fan
C Large spacer
D Through-bolt
E Dust cap
F Drive end housing
G Drive end bearing
H Bearing retainer
J Dust seal
K Small spacer
L Rotor
M Seal
N Bearing
O Slip ring end housing
P Rectifier assembly
R Brush box
S Stator
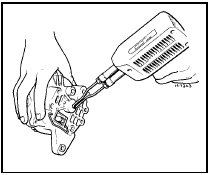
6.17b Using a soldering iron to heat the slip ring end housing - Mitsubishi
alternator
18 Undo the four bolts and remove the stator and rectifier assembly from the slip ring end housing.
19 Unsolder the brush box-to-rectifier assembly terminal and remove the brush box.
20 Renew the brush box and brushes if they are worn below the specified minimum.
21 Fit the new brushes by reversing the removal operations.
Insert a suitable piece of wire through the access hole in the housing to keep the brushes retracted as the housing is fitted (see illustration). After fitting the housing release the brushes by removing the wire.
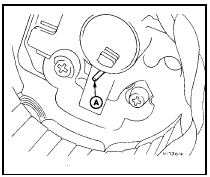
6.21 Using a length of wire (A) to hold brushes in the retracted position -
Mitsubishi alternator
See also:
Water pump - removal and refitting
OHV engines
Note: A new gasket and suitable jointing
compound must be used on refitting.
Removal
1 Drain the cooling system as described in
Chapter 1.
2 Slacken the three water pump pulley
reta ...
Exterior lamp bulbs - renewal
Note: The glass envelopes of the headlamp,
auxiliary driving lamp and front foglamp bulbs
must not be touched with the fingers. If the
glass is accidentally touched, it should be
washed with methy ...
Battery terminal check (Every 12 000 miles (20 000 km) or 12 months)
Caution: Before carrying out
any work on the vehicle battery,
read through the precautions
given in “Safety first!” at the
beginning of this manual.
1 The battery fitted as original equipment is
...
