Front brake caliper - removal, overhaul and refitting
Warning: Hydraulic fluid is poisonous; wash off immediately and thoroughly in the case of skin contact, and seek immediate medical advice if any fluid is swallowed or gets into the eyes. Certain types of hydraulic fluid are inflammable, and may ignite when allowed into contact with hot components; when servicing any hydraulic system, it is safest to assume that the fluid is inflammable, and to take precautions against the risk of fire as though it is petrol that is being handled. Hydraulic fluid is also an effective paint stripper, and will attack plastics; if any is spilt, it should be washed off immediately, using copious quantities of fresh water. Finally, it is hygroscopic (it absorbs moisture from the air) - old fluid may be contaminated and unfit for further use. When topping-up or renewing the fluid, use the recommended type, and ensure that it comes from a freshly-opened sealed container.
Note: Before starting work, refer to the warning at the beginning of Section 2 concerning the dangers of asbestos dust.
Removal
1 Proceed as described in paragraphs 1 to 8
in the previous Section.
2 Disconnect the brake flexible hose from the caliper. This can be carried out in one of two ways. Either disconnect the flexible hose from the rigid hydraulic pipeline at the support bracket by unscrewing the union, or, once the caliper is detached, hold the end fitting of the hose in an open-ended spanner and unscrew the caliper from the hose. Do not allow the hose to twist, and plug its end after caliper removal.
Overhaul
3 Brush away all external dirt and pull off the
piston dust-excluding cover.
4 Apply air pressure to the fluid inlet hole and eject the piston (see illustration). Only low air pressure is needed for this, such as is produced by a foot-operated tyre pump.
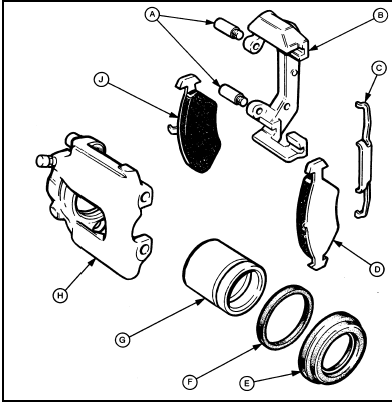
3.4 Exploded view of the front brake caliper
A Piston housing-toanchor
bracket bolts
B Anchor brackets
C Retaining clip
D Disc pad
E Dust excluder
F Piston seal
G Piston
H Piston housing
J Disc pad
5 Using a sharp pointed instrument, pick out the piston seal from the groove in the cylinder bore. Do not scratch the surface of the bore.
6 Examine the surfaces of the piston and the cylinder bore. If they are scored or show evidence of metal-to-metal rubbing, then a new piston housing will be required. Where the components are in good condition, discard the seal and obtain a repair kit.
7 Wash the internal components in clean brake hydraulic fluid or methylated spirit only, nothing else.
8 Using the fingers, manipulate the new seal into its groove in the cylinder bore.
9 Dip the piston in clean hydraulic fluid and insert it squarely into its bore.
10 Connect the rubber dust excluder between the piston and the piston housing, and then depress the piston fully.
Refitting
11 Refit the caliper by reversing the removal
operations, referring to paragraphs 11 to 16 in
the previous Section.
12 Reconnect the brake hose to the caliper, taking care not to distort it. When secured it must not interfere with any of the adjacent steering or suspension components.
13 Bleed the brake hydraulic circuit as given in Section 11 or 23, as applicable, then refit the roadwheel(s) and lower the vehicle.
See also:
Accessories
FORD ACCESSORIES FOR YOUR VEHICLE
A wide selection of genuine Ford accessories are available for your
vehicle through your local authorized Ford, Lincoln, Mercury or Ford of
Canada dealer. These qu ...
Vacuum servo unit and linkage - removal and refitting
Removal
1 Refer to Section 12 and remove the master
cylinder.
2 On fuel-injection models unclip and lift out
the front section of the heater plenum
chamber to provide access to the connecting
li ...
Ignition system component check (Every 6000 miles or 6 months)
1 Where applicable, remove the distributor
cap and thoroughly clean it inside and out
with a dry lint-free cloth. Examine the four HT
lead segments inside the cap. If the segments
appear badly bur ...
