Braking system warning lamps and electrical switches - removal and refitting
General
1 All models are fitted with a low fluid level
warning switch in the master cylinder reservoir
cap and a brake pedal stop-lamp switch.
2 Some versions have front disc pad wear sensors and a handbrake “ON” warning switch.
3 Warning indicator lamps are mounted on the instrument panel. Their renewal is covered in Chapter 12.
Handbrake “ON” warning lamp
switch
4 The handbrake “ON” warning switch is
attached to the handbrake lever and can be
removed after disconnecting the wiring and
undoing the retaining screw (see illustration).
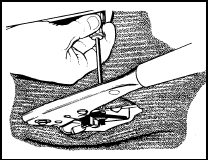
18.4 Removing handbrake warning switch
Stop-lamp switch 5 The stop-lamp switch can be removed by disconnecting the leads and unscrewing the locknut which holds the switch to its bracket under the facia (see illustration).
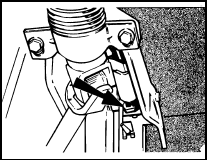
18.5 Brake stop-lamp switch locknut location (arrowed)
6 When fitting the switch, adjust its position by screwing it in or out so that it does not actuate during the first 5.0 mm of pedal travel.
See also:
General description
The independent front suspension is of the
MacPherson strut type, incorporating coil
springs and integral telescopic shock
absorbers. Lateral location of each strut
assembly is by a forged or pres ...
Coolant pump/alternator drivebelt tensioner (DOHC models with power
steering) - removal and refitting
Removal
1 Remove the alternator drivebelt.
2 Loosen the alternator lower mounting
through-bolt, then remove the alternator
upper mounting bolt and swing the alternator
away from the engine.
3 Un ...
Rear shock absorbers (Van models) - removal, testing and
refitting
Removal
1 Raise and support the rear of the vehicle on
stands (see “Jacking and Vehicle Support”).
Place a jack beneath the rear axle tube and
just raise it slightly.
2 Disconnect the shock absor ...
