Front suspension lower arm (pressed steel type) - removal, overhaul and refitting
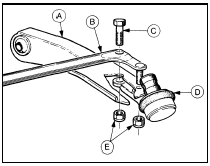
1 The pressed steel type suspension is only fitted to pre-May 1983 1.1 litre models (see illustration).

4.1 Pressed steel type lower arm components
A Lower arm
B Tie-bar
C Retaining bolt
D Balljoint
E Retaining nuts
Removal
2 Jack up the front of the car and support it
on stands (see “Jacking and Vehicle Support”).
3 Undo the nut and remove the pivot bolt securing the lower arm at its inboard end.
4 Undo the two nuts which secure the tie-bar and lower arm balljoint to the lower arm.
Separate the arm from the tie-bar and remove it from under the car.
Overhaul
5 Renewal of the pivot bush is carried out in
the same way as described in Section 3.
6 If the balljoint is worn it can be renewed after removing it from the hub carrier as described in Section 3.
Refitting
7 Refitting is the reverse sequence to
removal. Tighten all nuts and bolts to the
specified torque with the weight of the car on
its roadwheels. If the balljoint has been
removed, refit the Torx pinch-bolt with its
head towards the rear of the car.
See also:
Boot lid lock (Saloon models) - removal and refitting
Removal
1 With the boot lid raised, remove the lock
barrel retaining clip.
2 Where applicable, disconnect the operating
lever from the central locking solenoid/motor,
then withdraw the lock barre ...
Instrument panel components - removal and refitting
1 Remove the instrument panel.
Panel illumination and warning
lamp bulbs
2 Twist the relevant bulbholder anticlockwise
and withdraw it from the printed
circuit board on the rear of the instrument ...
Bonnet release cable - removal and refitting
Removal
1 Working inside the vehicle, extract the three
screws and remove the steering column
shroud. Open the bonnet. If the cable is broken,
the release latch must be operated using a
suitably ...
