Door window regulator - removal and refitting
Removal
1 Remove the door inner trim panel.
2 Where necessary for improved access, peel back the waterproof plastic sheet from the door.
3 Lower the window until the lower support channel is visible through the lower door aperture. Prise the regulator arms from the sockets in the support channel, then lower the window to the bottom of the door (see illustration).
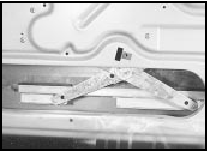
28.3 Front door window lower support channel and regulator arms
4 Drill out the four rivets securing the regulator assembly to the inner door skin, and if working on a front door, drill out the two rivets securing the regulator guide (see illustration).
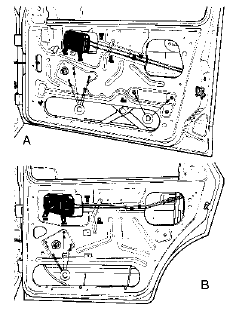
28.4 Door window regulator fixings
A Front door
B Rear door
C Regulator assembly securing rivets
D Regulator guide rivets
5 On models with electric windows, disconnect the motor wiring plug after disconnecting the battery negative lead.
Removal and refitting of the motor is described in Chapter 13.
6 Withdraw the regulator assembly through the lower door aperture.
Refitting
7 Refitting is a reversal of removal, but fit new
rivets, using a hand riveter.
See also:
Manifolds, exhaust and emission control systems
All models utilise a light alloy inlet manifold which on
carburettor models is coolant heated to improve the atomisation of the fuel/air
mixture.
The exhaust manifold is of cast iron construction ...
Seats - removal and refitting
Front seat
1 Slide the seat fully forwards, and on seats
with height adjustment unhook the tension
spring from the rear crosstube. Where
applicable, disconnect the wiring from the
seat heating pa ...
Throttle Position Sensor (TPS) - removal and refitting
Removal
1 Disconnect the battery negative lead.
2 Unclip and disconnect the sensor wiring
plug.
3 Remove the two securing screws, and
withdraw the sensor from the throttle valve
shaft (see illus ...
