
Windscreen wiper motor and linkage - removal and refitting
Removal
1 Remove the wiper arms and blades as
described in Section 17.
2 Disconnect the battery negative terminal.
3 Remove the nut covers, the fixing nuts, washers and spacers from the pivot shafts.
4 Disconnect the wiper motor wiring at the multi-pin plugs.
5 Unscrew the two fixing bolts and withdraw the motor complete with linkage from the engine compartment (see illustration).
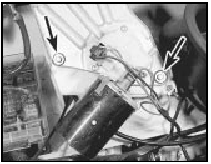
18.5 Windscreen wiper motor fixing bolts (arrowed)
6 Remove the spacers from the pivot shafts.
7 The motor can be separated from the linkage by removing the nut from the crankarm and then unbolting the motor from the mounting.
Refitting
8 Refitting is a reversal of removal, but
connect the motor crankarm when the link is
aligned with it as shown (see illustration).
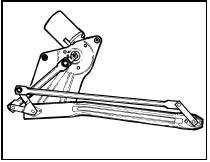
18.8 Windscreen wiper crankarm alignment for refitting
See also:
Idle Speed Control Valve (ISCV) - removal, cleaning and
refitting
Removal
1 Disconnect the battery negative lead.
2 Disconnect the valve wiring plug (see
illustration).
12.2 Idle speed control valve - 1.6 EFI engine
A Wiring plug B Securing bolts
3 Unscrew t ...
Master cylinder (conventional braking system) - removal, overhaul and
refitting
Note: Before commencing overhaul obtain a
repair kit containing new pistons and seals.
Caution: Refer to the
precautions in Section 1.
Removal
1 Depress the brake pedal several times to
dissipat ...
Engine - reassembly
Note: Ensure that all necessary new oil seals
and gaskets have been obtained before
starting the reassembly procedure.
OHV engines
1 With everything clean, commence
reassembly by oiling the bores ...
