Engine dismantling, examination, renovation and reassembly - general information
Dismantling
1 It is best to mount the engine on a
dismantling stand but if this is not available,
stand the engine on a strong bench at a
comfortable working height. Failing this, it will
have to be stripped down on the floor.
2 Cleanliness is most important, and if the engine is dirty, it should be cleaned with paraffin while keeping it in an upright position.
3 Avoid working with the engine directly on a concrete floor, as grit presents a real source of trouble.
4 As parts are removed, clean them in a paraffin bath. However, do not immerse parts with internal oilways in paraffin as it is difficult to remove, usually requiring a high pressure hose. Clean oilways with nylon pipe cleaners.
5 It is advisable to have suitable containers available to hold small items according to their use, as this will help when reassembling the engine and also prevent possible losses.
6 Always obtain a complete set of new gaskets for use during engine reassembly, but retain the old gaskets with a view to using them as a pattern to make a replacement if a new one is not available.
7 Where possible, refit securing nuts, bolts and washers to their locations after removing the relevant components. This will help to protect the threads and will also prevent losses.
8 Retain unserviceable components in order to compare them with the new parts supplied.
9 Suitable splined sockets will be required for removal of the oil pump bolts, the timing belt tensioner bolts on early models (up to mid- 1985), and the cylinder head bolts on early models (up to early 1984) and a size T55 Torx socket will be required to remove the cylinder head bolts on later models (from early 1984).
10 Before dismantling the main engine
components the following externally mounted
ancillary components can be removed, with
reference to the relevant Chapters of this
Manual and the relevant Sections of this
Chapter, where applicable:
Inlet manifold (and carburettor, where
applicable
Exhaust manifold
Fuel pump and operating pushrod (where
applicable)
Alternator
Distributor, HT leads and spark plug
Coolant pump, thermostat and housing
Temperature gauge sender and oil pressure
warning lamp switch
Oil filter
Dipstick
Engine mounting brackets (see illustration)
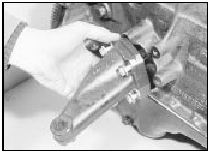
18.10a Removing the right-hand engine mounting bracket
Crankcase ventilation valve and oil separator
Clutch
Alternator mounting bracket (see illustration)
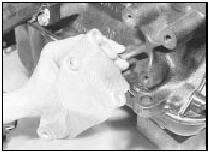
18.10b Removing the alternator mounting bracket
Examination and renovation 11 With the engine completely stripped, clean all the components and examine them for wear. Each part should be checked, and where necessary renewed or renovated as described in the relevant Sections. Renew main and big end shell bearings as a matter of course, unless it is known that they have had little wear and are in perfect condition.
12 If in doubt as to whether to renew a component which is still just serviceable, consider the time and effort which will be incurred should it fail at an early date.
Obviously the age and expected life of the vehicle must influence the standards applied.
13 Gaskets, oil seals and O-rings must all be renewed as a matter of routine. Flywheel and Torx type cylinder head bolts must be renewed because of the high stresses to which they are subjected.
14 Take the opportunity to renew the engine core plugs while they are easily accessible.
Knock out the old plugs with a hammer and chisel or punch. Clean the plug seats, smear the new plugs with sealant and tap them squarely into position.
Reassembly
15 To ensure maximum life with minimum
trouble from a rebuilt engine, not only must
everything be correctly assembled, but it must
also be spotlessly clean. All oilways must be
clear, and locking washers and spring
washers must be fitted where indicated. Oil all
bearings and other working surfaces
thoroughly with clean engine oil during
assembly.
16 Before assembly begins, renew any bolts or studs with damaged threads.
17 Gather together a torque wrench, oil can, clean rag, and a set of engine gaskets and oil seals, together with a new oil filter.
18 If they have been removed, new Torx type cylinder head bolts and new flywheel bolts will be required.
19 After reassembling the main engine components, refit the ancillary components listed, referring to the appropriate Chapters where necessary. Delicate items such as the alternator and distributor may be left until after the engine has been refitted if preferred.
20 If the crankcase ventilation oil separator was removed, apply a liquid sealing agent to its tube before pressing it into the cylinder block.
See also:
Integral heated rear window/radio aerial amplifier - removal and refitting
1 Disconnect the battery negative lead.
Saloon models
2 Remove both rear seat side cushions.
3 Remove the securing screws and withdraw
the rear parcel shelf.
4 Make a note of the wiring connectio ...
Cylinder head - removal and refitting
Carburettor engines
Removal
Note: The cylinder head must only be
removed when the engine is cold. New
cylinder head bolts and a new gasket must be
used on refitting.
1 Disconnect the battery ear ...
Radiator - removal, inspection and refitting
All models except RS Turbo
Pre-1986 models
Removal
1 Drain the cooling system as described in
Chapter 1.
2 Disconnect the battery negative terminal.
3 Release the retaining clips and disconnect
...
