Cylinder head - removal and refitting (engine removed)
Note: Up to early 1984, splined type cylinder head bolts were used, and from early 1984, size T55 Torx bolts were used. Torx type bolts must always be renewed after slackening. The two types of bolts are interchangeable, but only in complete sets - the two types must not be mixed on the same engine. A suitable special socket will be required for removal of the bolts, and a new cylinder head gasket must be used when refitting.
Removal
1 With the manifolds removed, proceed as
follows.
2 Remove the timing belt.
3 Where applicable, disconnect the breather hose from the camshaft cover.
4 Unscrew the ten securing bolts and remove the camshaft cover and gasket. Take care not to lose the spacer plates which fit under the bolt heads, where applicable.
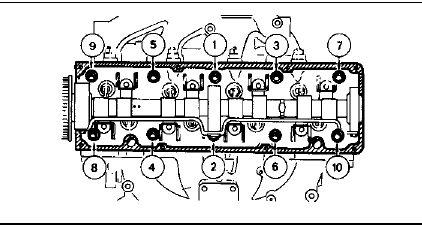
5 Using the relevant special socket, unscrew the ten cylinder head bolts half a turn at a time in the reverse order to that shown for tightening.
6 With the bolts removed, lift the cylinder head from the block. If the cylinder head is stuck, tap it free with a wooden mallet. Place the cylinder head on blocks of wood to prevent damage to the valves.
7 Recover the gasket.
Refitting
8 Commence refitting as follows.
9 With the cylinder head supported on blocks of wood, check and if necessary adjust the valve clearances. This work is easier to carry out on the bench rather than in the vehicle.
10 Turn the crankshaft so that No 1 piston is approximately 20 mm (0.8 in) before TDC.
This precaution will prevent any damage to open valves.
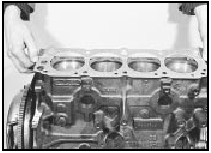
11 Make sure that the mating faces of the cylinder block and cylinder head are perfectly clean, then locate the new gasket on the block making sure that all the internal holes are aligned (see illustration). Do not use jointing compound.

21.11 Fitting a new cylinder head gasket
12 Turn the camshaft so that the TDC pointer on the camshaft sprocket backplate is aligned with the indentation on the front of the cylinder head.
13 Lower the cylinder head onto the gasket.
The help of an assistant will ensure that the gasket is not dislodged.
14 Lightly oil the cylinder head bolt threads and heads, then insert the bolts into their locations in the cylinder head. Note that if the original bolts were of the Torx type, new bolts must be used when refitting.
15 Using the relevant special socket, tighten the bolts in the correct sequence (see illustration)

21.15 Cylinder head bolt tightening sequence
to the stages given in the Specifications. Note that the bolt tightening stages are different for splined and Torx type bolts. If splined type bolts are used, they must be finally tightened to the fourth stage after the engine has been run for 15 minutes (see Specifications).
16 Check the condition of the camshaft cover gasket and renew if necessary. Fit the gasket to the camshaft cover, ensuring that the locating tabs and dovetails are correctly located, then refit the camshaft cover and tighten the securing bolts in the order shown (see Chapter 1, Section 23), ensuring that the spacer plates are in position under the bolt heads, where applicable.
17 Where applicable, reconnect the breather hose to the camshaft cover.
18 Refit the timing belt.
See also:
Power-operated folding roof - fluid level checking and bleeding
General
1 As from 1987, a power-operated folding
roof is available as an option on Cabriolet
models.
2 The roof is operated hydraulically from an
electric pump located in the left-hand side of
t ...
Valve block (ABS) - removal and refitting
Caution: Refer to the
precautions in Section 1.
Removal
1 Disconnect the battery negative lead.
2 Depressurise the hydraulic system by
pumping the brake pedal at least 20 times, or
until it beco ...
Diagram 1: 1980-86 Starting, charging, and ignition (except
fuel injection models)
Diagram 1: 1980-86 Starting, charging, and ignition (except fuel injection
models) ...
