Timing chain and sprockets - removal and refitting
Note: Refer to the warning at the beginning of Section 5 before proceeding. A suitable puller will be required to remove the crankshaft pulley.
A new crankshaft pulley bolt, a new timing chain tensioner plunger assembly, new upper and lower timing chain cover gaskets, and a new camshaft cover gasket and reinforcing sleeve sealing rings, must be used on refitting.
Removal
1 If the engine is in the car, carry out the
following operations:
a) Disconnect the battery negative lead.
b) To improve access, remove the radiator. It will be difficult to remove the crankshaft pulley with the radiator in place.
c) On carburettor models, remove the air cleaner.
d) On fuel injection models, remove the air inlet hose, plenum chamber, and air cleaner lid as an assembly.
e) Disconnect the breather hose from the camshaft cover.
f) Remove the distributor cap and HT leads, and the rotor arm and housing.
2 Proceed as described in paragraphs 2 to 11 inclusive of Section 18 (see illustration).
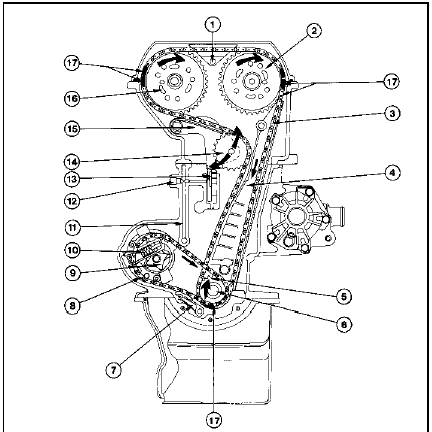
15.2 Timing chain, oil pump drive chain and associated components
1 Upper timing chain guide
2 Exhaust camshaft sprocket
3 Timing chain
4 Lower timing chain guide
5 Crankshaft sprocket (double)
6 Crankshaft
7 Oil pump chain tensioner
8 Oil pump drive chain
9 Oil pump
10 Oil pressure relief valve
11 Oil passage to timing chain tensioner plunger
12 Plug
13 Timing chain tensioner plunger
14 Timing chain tensioner sprocket
15 Timing chain tensioner arm
16 Inlet camshaft sprocket
17 Copper chain links
3 Remove the alternator drivebelt.
4 Slacken the crankshaft pulley bolt. Prevent the crankshaft from turning by engaging top gear (manual gearbox only) and having an assistant press the brake pedal hard, or by removing the starter motor and jamming the ring gear teeth with a lever.
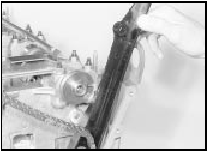
5 Unscrew the bolt part-way, and use a puller to remove the crankshaft pulley. The legs of the puller must be suitably shaped to enable them to rest on the metal surfaces of the pulley. Do not use a puller on the rubber surface of the pulley (see illustrations).
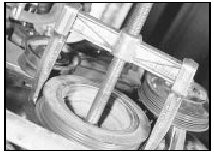
15.5a Remove the crankshaft pulley using a puller (viewed from under vehicle)
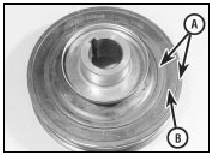
15.5b Position the legs of the puller on the metal surfaces of the pulley
(A), not the rubber surface (B)
6 Loosen the alternator lower mounting through-bolt, then remove the alternator upper mounting bolt, and swing the alternator away from the engine.
7 Unscrew the central securing bolt, and withdraw the drivebelt tensioner assembly.
8 Unscrew the eleven securing bolts, and remove the lower timing chain cover. Recover the rubber gasket.
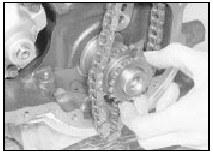
9 Using a suitable Torx socket, unscrew the securing screw, and carefully withdraw the oil pump chain tensioner (see illustration).
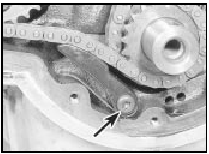
15.9 Oil pump chain tensioner securing screw (arrowed)
10 Unscrew the Torx type securing bolt, and withdraw the oil pump sprocket, complete with the oil pump drive chain.
11 Unscrew the two lower timing chain guide securing bolts, noting their locations, and withdraw the timing chain guide through the top of the timing case (see illustration).
15.11 Withdrawing the lower timing chain guide
12 Remove the Woodruff key from the end of the crankshaft, prising it free with a screwdriver if necessary, then slide the double chain sprocket from the end of the crankshaft, and lift the chain from the sprocket (see illustration).
15.12 Sliding the double chain sprocket from the end of the crankshaft
13 Withdraw the timing chain through the top of the timing case and, where applicable, remove the cable-tie from the chain (see illustration).

15.13 Withdrawing the timing chain through the top of the timing case
Refitting
14 Commence refitting as follows. Note that
coppered links are provided in the timing
chain to assist with refitting, but these can be
difficult to see on a chain which has already
been in service. If possible, position the
coppered links as described during the
following procedure. If the coppered links are
not visible, the chain should still be refitted as
described, but ignore the references to the
coppered links.
15 Make sure that the slot for the Woodruff key in the end of the crankshaft is pointing vertically downwards. If necessary, temporarily refit the crankshaft pulley bolt in order to turn the crankshaft to the required position.
16 Lower the timing chain into the timing case from above, with the single coppered link at the bottom. If desired, use a cable-tie to prevent the chain from dropping into the timing case, as during removal.
17 Locate the double chain sprocket loosely over the end of the crankshaft (larger sprocket nearest the crankcase), with the timing mark pointing vertically down.
18 Fit the chain over the inner, larger sprocket, aligning the coppered link in the chain with the timing mark on the sprocket (see illustration).
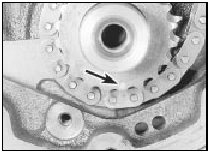
15.18 Coppered link in timing chain aligned with crankshaft sprocket timing
mark (arrowed)
19 Coat the threads of the lower timing chain guide lower securing bolt with a suitable thread-locking compound.
20 Introduce the lower timing chain guide through the top of the timing case, manipulating the chain around the guide as necessary, then fit the chain guide lower securing bolt and tighten it finger-tight.
21 Push the double chain sprocket onto the crankshaft, engaging the notch in the sprocket with the groove in the end of the crankshaft.
22 Proceed as shown in paragraphs 34 to 42 of Section 18 but when fitting the chain over the camshaft sprockets, align the timing mark on each sprocket between the two corresponding coppered links in the chain.
23 Coat the threads of the lower timing chain guide upper securing bolt with a suitable thread-locking compound, then fit the bolt and tighten it finger-tight.
24 Proceed as shown in paragraphs 43 to 46 of Section 18.
25 Tighten the two chain guide securing bolts to the specified torque.
26 Proceed as shown in paragraphs 47 to 55 of Section 18.
27 Fit the oil pump drive chain around the outer crankshaft sprocket and the oil pump sprocket, then refit the oil pump sprocket, and tighten the securing bolt to the specified torque. If necessary, a screwdriver can be inserted through one of the holes in the sprocket to prevent it from turning as the securing bolt is tightened.
28 Refit the oil pump drive chain tensioner, and tighten the securing bolt to the specified torque.
29 Refit the Woodruff key to the end of the crankshaft.
30 Inspect the oil seal in the lower timing chain cover. If the oil seal is in good condition, the cover can be refitted as follows, but if the seal is damaged, or has been leaking, a new seal should be fitted to the cover. If necessary, carefully prise the old oil seal from the cover using a screwdriver. The new seal should be fitted dry. Drive in the new seal using a suitable metal tube, making sure that the seal lip faces into the engine, and taking care not to damage the timing chain cover (see illustration).
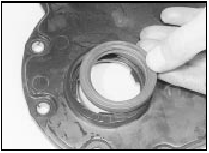
15.30 Fitting a new lower timing chain cover oil seal
31 Fit the lower timing chain cover using a new rubber gasket (see illustration).
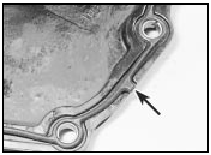
15.31 Lower timing chain cover rubber gasket in position. Ensure that lug on
gasket engages with notch in cover (arrowed)
32 Loosely refit the timing chain cover securing bolts.
33 Refit the crankshaft pulley to the end of the crankshaft, and draw the pulley onto the crankshaft using the original securing bolt, at the same time centring the lower timing chain cover.
34 With the lower timing chain cover centralised, and the pulley fully home on the crankshaft, remove the old securing bolt, then fit a new bolt.
35 Tighten the new crankshaft pulley bolt to the specified torque, in the two stages given in the Specifications at the beginning of this Chapter. Prevent the crankshaft from turning as during removal.
36 Tighten the lower timing chain cover securing bolts.
37 Refit the drivebelt tensioner assembly, ensuring that the lug on the rear of the tensioner bracket engages with the corresponding hole in the cylinder block, and tighten the securing bolt.
38 Swing the alternator into position to align the upper mounting bolt hole with the corresponding hole in the drivebelt tensioner assembly, then refit the upper mounting bolt, and tighten the upper bolt and the lower through-bolt.
39 Refit the alternator drivebelt.
40 If the engine is in the vehicle, reverse the operations described in paragraph 1.
41 If applicable, refill the cooling system.
Timing chain, sprockets and tensioner - examination and renovation
1 Examine alI the teeth on the camshaft and crankshaft sprockets. If the teeth are “hooked” in appearance, renew the sprockets.
2 Examine the chain tensioner plastic sprocket for wear. If excessive wear is evident, the complete tensioner assembly must be renewed, as the sprocket cannot be renewed independently. Note that the tensioner plunger assembly must be renewed whenever the timing chain is removed.
3 Examine the timing chain for wear. If the chain has been in operation for a considerable time, or if when held horizontally (rollers vertical) it takes on a deeply-bowed appearance, renew it.
See also:
Locks and Security
KEYS
The key operates all locks on your vehicle. In case of loss, replacement
keys are available from your dealer.
You should always carry a second key with you in a safe place in case
you requi ...
Door interior handle - removal and refitting
Removal
1 Remove the door inner trim panel.
2 Where necessary for improved access, peel
back the waterproof plastic sheet from the
door.
3 Remove the two securing screws in the
case of models up ...
Exhaust manifold - removal and refitting
Note: A new gasket will be required on
refitting.
Removal
1 Disconnect the battery negative lead.
2 On carburettor and CFI engine models
remove the air cleaner as described in the
appropriate Pa ...
