Bonnet lock release cable - removal and refitting
Removal
1 Working inside the vehicle, remove the
three retaining screws, and withdraw the
lower steering column shroud.
2 Remove the retaining screw, and withdraw the release cable bracket from the steering column.
3 Working in the engine compartment, pull the cable sheath end fitting from its bracket, and release the cable end fitting from the lock lever (see illustration).
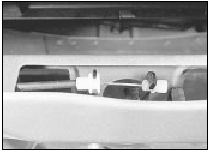
7.3 Bonnet lock release cable end fittings - models up to 1987
4 Release the cable from the clips in the engine compartment.
5 Pull the cable through the bulkhead into the passenger compartment, taking care not to lose the bulkhead grommet.
Refitting
6 Refitting is a reversal of removal, but ensure
that the grommet is correctly located in the
bulkhead, and that the cable is free from
sharp bends and kinks. There should be a
small amount of free play at the lock end of
the cable if necessary re-route the cable to
achieve this condition.
7 Note that should the release cable snap while the bonnet is shut, the bonnet may be opened as follows.
8 Apply the handbrake, jack up the front of the vehicle and support on axle stands (see “Jacking and Vehicle Support”).
9 Using an inspection lamp or torch, look up between the radiator and the radiator grille panel and locate the circular hole below the bonnet lock (see illustration).
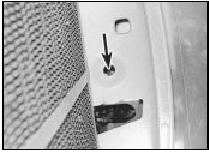
7.9 Access hole (arrowed) below bonnet lock
10 Insert a screwdriver through the hole so that it passes to the right of the lock striker.
Twist or lever the lock sliding plate to the right until the striker is released. The bonnet can now be opened.
Bonnet lock - removal and refitting
Models up to 1987
1 Working in the engine compartment,
disconnect the cable from the bonnet lock by
pulling the cable sheath end fitting from its
bracket, then releasing the end fitting from the
lock lever.
2 Remove the three securing screws and withdraw the lock from the front panel.
3 Refitting is a reversal of removal.
Models from 1987
4 Remove the radiator grille panel.
5 Disconnect the cable from the bonnet lock by pulling the cable sheath end fitting from its bracket, then releasing the end fitting from the lock lever.
6 Detach the bracing strut from the lock by removing the screw, then remove the two securing screws and withdraw the lock from the front panel.
7 Refitting is a reversal of removal.
See also:
Handbrake - adjustment
1 Adjustment of the handbrake is normally
automatic by means of the self-adjusting
mechanism working on the rear brake shoes.
2 However, due to cable stretch, occasional
inspection of the handbrak ...
Engine - removal leaving manual gearbox in vehicle
Note: A suitable hoist and lifting tackle will be
required for this operation.
1.8 litre (R2A type)
1 Disconnect the battery negative lead.
2 Remove the bonnet.
3 Remove the air cleaner.
4 Disco ...
Servicing your tires
Checking the tire pressure
Use an accurate tire pressure gauge.
Check the tire pressure when tires are cold, after the vehicle has been
parked for at least one hour or has been driven less tha ...
