Tailgate/boot lid/fuel filler flap release cable - removal and refitting
Removal
1 Operate the control lever to open the
tailgate/boot lid and the fuel filler flap (see
illustration).
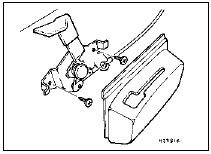
14.1 Tailgate/boot lid/fuel filler flap control lever assembly
2 Remove the driver’s side centre pillar lower trim panel and the sill trim panel.
3 Withdraw the cover from the control lever.
4 Unscrew the two securing bolts, and detach the control lever assembly from the body panel. Detach the cable from the control assembly.
5 Fold the rear seat cushion forwards or remove it, as applicable, and remove the rear seat side cushion for access to the wheel arch trim panel.
6 Detach the trim panel from the wheel arch by removing the two securing screws from the parcel shelf bracket. Free the cable up to the wheel arch.
7 Working inside the luggage compartment, remove the trim panels for access to the petrol flap lock and tailgate/boot lid lock.
8 Disengage the petrol flap catch from the housing by twisting and pulling out (see illustration). Carefully pull the cable through into the luggage compartment, noting its routing.
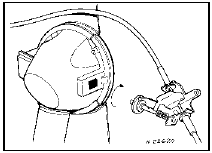
14.8 Disengaging the petrol flap catch from the housing
9 Remove the securing screws, and withdraw the tailgate/boot lid lock striker from the body panel. Withdraw the striker and cable assembly.
Refitting
10 Commence refitting by installing the
tailgate/boot lid striker and cable assembly.
Secure the cable to the body with tape.
11 Route the cable back to the petrol flap housing, and refit the petrol flap catch.
12 Route the cable into the interior of the vehicle, and refit the luggage compartment trim panels.
13 Route the cable to the control lever, securing the cable with tape to the body, then refit the wheel arch trim panel, and refit the seat cushions.
14 Reconnect the cable to the control lever assembly, then refit the assembly.
15 Refit the control lever cover and the trim panels.
Tailgate/boot lid spoiler - removal and refitting
Models up to 1990
1 Open the tailgate/boot lid.
2 Prise the four screw covers from the spoiler, then remove the screws, and withdraw the spoiler.
3 Refitting is a reversal of removal.
Models from 1990
4 Open the tailgate/boot lid.
5 Remove the inner tailgate/boot lid trim panel for access to the spoiler securing nuts.
6 Unscrew the central spoiler securing nut, then unscrew the four outer securing nuts (two on each side), and withdraw the spoiler.
7 Refitting is a reversal of removal.
See also:
Cylinder head - dismantling and reassembly
Note: A valve spring compressor will be
required during this procedure. New valve
stem oil seals should be used on reassembly.
Dismantling
1 With the cylinder head removed, remove
the camshaft.
...
General information
The 2.0 litre DOHC (Double OverHead
Camshaft) engine was introduced in August
1989 to replace the 2.0 litre SOHC engine
used previously in the Sierra range. The
engine is of four-cylinder, in-line ...
Modulator (anti-lock braking system) - removal and refitting
Note: Whenever an ABS modulator adjuster
bolt is slackened or removed, the bolt threads
should be lightly coated with grease to
prevent the possibility of bolt seizure. Take
care not to contaminat ...
