Radiator grille panel - removal and refitting
Models up to 1987
1 With the bonnet raised, remove the four
grille panel securing screws from the top of
the front panel.
2 Lift the grille panel from its lower mounting bushes, and withdraw it from the vehicle.
3 Refitting is a reversal of removal, but ensure that the lower mounting lugs are correctly located in their bushes.
Models from 1987
4 With the bonnet raised, remove the two
grille panel securing screws from the front
face of the panel.
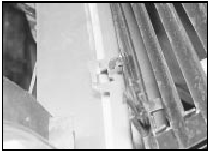
5 Release the upper and lower grille retaining clips, and withdraw the grille panel from the vehicle (see illustrations).
32.5a Radiator grille panel upper retaining clip - models from 1987
32.5b Radiator grille panel lower retaining clip - models from 1987
6 Refitting is a reversal of removal, but align the grille panel carefully before tightening the securing screws.
Models from 1990
7 With the bonnet raised, remove the two
securing screws from the top of the grille
panel.
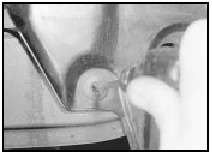
8 Slide the panel towards the driver’s side of the vehicle, then pull the panel forwards to release the retaining clips (see illustration).
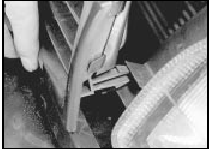
32.8 Removing the later type front grille
panel
9 Refitting is a reversal of removal.
Windscreen cowl panel - removal and refitting
Removal
1 Open the bonnet and disconnect the
windscreen washer hose at the T-piece
connector.
2 Remove both windscreen wiper arm assemblies.
3 Remove the single securing screw from each end of the cowl panel.
4 On models up to 1987, prise out the screw covers and remove the eight plastic screws securing the cowl panel to the body.
Withdraw the panel.
5 On models from 1987, prise out the screw covers and remove the plastic securing screws. Pull the front edge of the cowl panel upwards to disengage the front fixing clips, then move the panel to the left and then to the right to disengage the hooks on the panel underside. Withdraw the panel.
Refitting
6 Refitting is a reversal of removal.
Exterior rear pillar trim panel (Saloon models) - renewal
1 Remove the interior rear pillar trim panel.
2 Unscrew the three now exposed securing nuts and withdraw the exterior trim panel (see illustration).
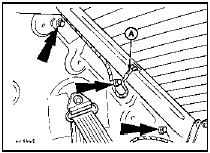
34.2 Exterior rear pillar trim panel securing nut locations (arrowed) -
Saloon models A Heated rear window wiring plug
3 Refitting is a reversal of removal, but do not overtighten the securing nuts, as this may result in damage to the rubber seals.
Cab air vent panel (P100 models) - renewal
1 Remove the cab interior side trim panel.
2 Working inside the cab, remove the two rubber grommets from the rear pillar, then unscrew the two now exposed nuts, and withdraw the air vent panel.
3 Refitting is a reversal of removal.
Wheel arch liners - renewal
1 Where fitted, the wheel arch liners may be retained by self-tapping screws, plastic clips, or a combination of both.
2 To remove a liner, simply unscrew the retaining screws, or where plastic clips are fitted, release them by turning with a screwdriver (see illustration).
36.2 Releasing a wheel arch liner plastic clip
3 Refitting is a reversal of removal.
See also:
Central door locking system components - removal and refitting
General
1 On pre-1986 models the locks, with the
exception of the one on the driver’s door, are
actuated by solenoids (see illustration).
18.1 Layout of the solenoid operated central door lockin ...
Engine - complete dismantling
1 The need for dismantling will have been
dictated by wear or noise in most cases.
Although there is no reason why only partial
dismantling cannot be carried out to renew
such items as the oil pum ...
Identifying components in the engine compartment
2.0L DOHC Zetec engine
Transmission fluid dipstick (automatic transaxle)
Battery
Air filter assembly
Engine oil filler cap
Engine oil dipstick
Power steering fluid reservoir
Engine ...
