Central door locking components - operation, removal and refitting
Note: If a central locking solenoid or motor is to be renewed due to jamming or overheating, the central locking relay must be renewed at the same time even if it is believed to be working correctly. Before starting work on the central locking system, unlock all the doors and the tailgate/boot. Make sure that the keys are outside the vehicle before reconnecting the battery on completion of work.
Operation
Models up to 1987
1 The central locking system is activated by
turning the key in the driver’s door lock, and
the locks are operated by solenoids.
Models from 1987
2 The system is activated by turning the key
in either of the front door locks, and the locks
are operated by electric motors.
Removal and refitting
3 Disconnect the battery negative lead.
Models up to 1987
Switch (driver’s door lock)
4 Remove the door lock.
5 Remove the two securing screws, then withdraw the switch from the lock assembly and disconnect the wiring plug.
6 Refitting is a reversal of removal, but ensure that the cut-out in the switch lever engages with the lock lever (see illustration).
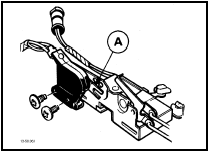
50.6 Driver’s door central locking switch - models up to 1987
A Switch lever cut-out
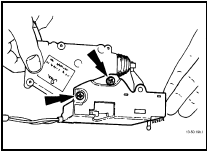
Solenoids (passenger and rear door locks) 7 Remove the door lock (see illustration).
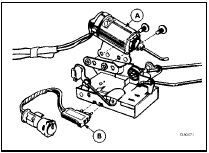
50.7 Central door locking assembly models up to 1987
A Solenoid
B Door ajar switch (not fitted to all models)
8 Remove the two securing screws, then disconnect the solenoid operating rod and the wiring plug and withdraw the solenoid from the lock assembly.
9 Refitting is a reversal of removal.
Solenoid (tailgate lock) 10 Open the tailgate and remove the trim panel.
11 Disconnect the solenoid wiring plug and earth lead, and the operating rod, then remove the two securing screws and withdraw the solenoid from the tailgate (see illustration).
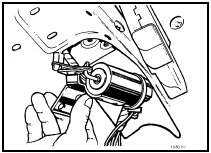
50.11 Removing a tailgate lock solenoid - Hatchback models up to 1987
12 Refitting is a reversal of removal.
Models from 1987
Motors (door locks)
13 Remove the door inner trim panel.
14 Remove the retaining screws and disconnect the wiring plug and the motor operating rod, then withdraw the motor from the door.
15 Refitting is a reversal of removal.
Motor (tailgate and boot lid locks) 16 Open the tailgate/boot lid and where applicable remove the trim panel.
17 Remove the retaining screws and disconnect the wiring plug and the motor operating rod, then withdraw the motor from the tailgate/boot.
18 Refitting is a reversal of removal.
Models from 1990
Motors (door locking)
19 On models from 1990, the door locking
motors are incorporated in the door lock units
(see illustrations).
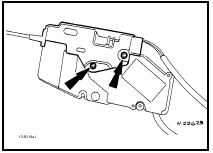
50.19a Front door central locking motor securing screws (arrowed) - models
from 1990
50.19b Rear door central locking motor securing screws (arrowed) - models
from 1990
20 To remove a motor, first remove the door lock.
21 Remove the two securing screws, and detach the motor from the lock assembly.
22 Refitting is a reversal of removal, ensuring that the motor operating rod engages with the lock lever.
See also:
General information and precautions
Contact breaker ignition system
The ignition system is divided into two
circuits, low tension (primary) and high tension
(secondary). The low tension circuit consists of
the battery, ignition swit ...
Sump - removal and refitting
Note: New gaskets and sealing strips will be
required for refitting, and sealing compound
will be required to coat the gasket faces.
Removal
1 If the engine is in the vehicle, proceed as
follows, ...
Servicing your tires
Checking the tire pressure
Use an accurate tire pressure gauge.
Check the tire pressure when tires are cold, after the vehicle has been
parked for at least one hour or has been driven less tha ...
