Anti-theft alarm - location, removal and refitting
Note: The alarm system has a self-diagnosis function, which allows a Ford dealer to carry out fault diagnosis, using suitable specialist equipment. In the event of a problem with the alarm system, it is advisable not to tamper with the components until appropriate fault diagnosis has been carried out.
Location
1 From 1990, certain models are fitted with
an anti-theft alarm (see illustration).
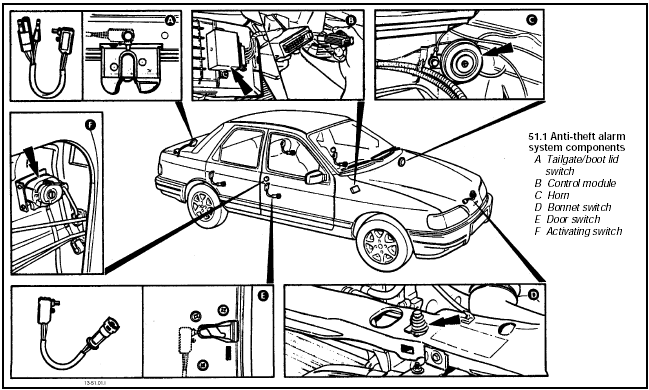
51.1 Anti-theft alarm system components
A Tailgate/boot lid switch
B Control module
C Horn
D Bonnet switch
E Door switch
F Activating switch
2 The alarm system consists of a control module mounted behind the driver’s side facia; trip switches fitted to the doors, tailgate/boot lid, and bonnet; activating switches fitted to the front door locks; an additional horn mounted at the bulkhead next to the battery and an indicator light mounted on the top of the facia.
Module - removal and refitting 3 Disconnect the battery negative lead.
4 Release the carpet trim panel from under the driver’s side facia.
5 Reach up behind the facia and locate the control module. Release the plastic retaining clips using a screwdriver, and lower the module.
6 Disconnect the wiring plug and withdraw the module.
7 Refitting is a reversal of removal.
Seat heating pad - removal and refitting
Removal
1 Disconnect the battery negative lead.
2 Remove the seat.
3 Remove the seat cushion trim or backrest trim as necessary.
4 Note which way round the pad is fitted, then remove the wire clips and adhesive tape which secure it to the seat. Retrieve the tierod and fit it to the new pad.
Refitting
5 Fit the new pad with the thermostat facing
the cushion foam (see illustration). Secure
the pad with wire clips and tape, making sure
that it is not too tight - it must be able to flex
when sat on.
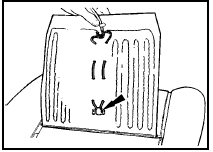
52.5 Seat heating pad
Thermostat (arrowed) must face foam
6 Refit the cushion or backrest trim, as applicable, being careful not to trap or kink the pad.
7 Refit the seat, reconnect the wiring and check the pads for correct operation.
See also:
Fuel injectors - removal and refitting
Note: Refer to the precautions at the end of
Section 1 before proceeding. New injector
seals will be required on refitting.
Removal
1 Disconnect the battery negative lead.
2 Depressurise the fuel ...
Key to wiring diagrams
Key to wiring diagrams
Key to wiring diagrams ...
Wash/wipe system components - removal and refitting
Windscreen washer pump
Engine compartment-mounted
reservoir
Removal
1 Drain the washer fluid container.
2 Disconnect the lead and washer pipe.
3 Ease the top of the washer pump away
from the fl ...
