Spark plug renewal - RS Turbo models (Every 6000 miles or 6 months)
1 The correct functioning of the spark plugs is vital for the correct running and efficiency of the engine. It is essential that the plugs fitted are appropriate for the engine, and the suitable type is specified at the end of this chapter. If this type is used and the engine is in good condition, the spark plugs should not need attention between scheduled replacement intervals. Spark plug cleaning is rarely necessary and should not be attempted unless specialised equipment is available as damage can easily be caused to the firing ends.
2 To remove the plugs, first mark the HT leads to ensure correct refitment, then pull them off the plugs. When removing the leads, pull the terminal insulator at the end of the lead - not the lead itself.
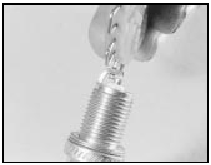
3 Using a spark plug spanner or deep socket and extension bar, unscrew the plugs and remove them from the engine (see illustration).
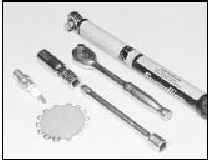
15.3 Tools required for spark plug removal, gap adjustment and refitting
4 The condition of the spark plugs will also tell much about the condition of the engine.
5 If the insulator nose of the spark plug is clean and white, with no deposits, this is indicative of a weak mixture, or too hot a plug.
(A hot plug transfers heat away from the
electrode slowly - a cold plug transfers it away
quickly.)
6 If the tip and insulator nose are covered
with hard black-looking deposits, then this is
indicative that the mixture is too rich. Should
the plug be black and oily, then it is likely that
the engine is fairly worn, as well as the mixture
being too rich.
7 If the insulator nose is covered with light tan to greyish brown deposits, then the mixture is correct and it is likely that the engine is in good condition.
8 The spark plug gap is of considerable importance, as if it is too large or too small, the size of the spark and its efficiency will be seriously impaired. The spark plug gap should be set to the figure given in the Specifications at the beginning of this Chapter.
9 To set it, measure the gap with a feeler blade, and then bend open, or close, the outer plug electrode until the correct gap is achieved (see illustration). The centre electrode should never be bent as this may crack the insulation and cause plug failure, if nothing worse.
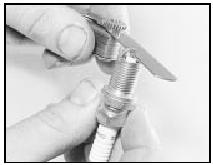
15.9 Measuring the spark plug gap with a feeler blade
10 Special spark plug electrode cap adjusting tools are available from most motor accessory shops (see illustrations).
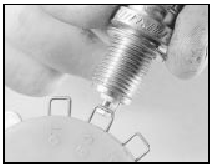
15.10a Measuring the spark plug gap with a wire gauge . . .
15.10b . . . and adjusting the gap using a special adjusting tool
11 Before fitting the plugs first ensure that the plug threads and the seating area in the cylinder head are clean, dry and free of carbon.
12 Screw the plugs in by hand initially and then fully tighten to the specified torque. If a torque wrench is not available, tighten the plugs until initial resistance is felt, then tighten by a further 1⁄16 of a turn for the taper seat plugs fitted to OHV engines, or 1⁄4 of a turn for the gasket seat type fitted to CVH engines. Do not over-tighten the spark plugs, otherwise damage to the threads may occur and they will also be extremely difficult to remove in the future.
13 Refit the plug leads in the correct order ensuring that they are a secure fit over the plug ends. Periodically wipe the leads clean to reduce the risk of HT leakage by arcing and remove any traces of corrosion that may occur on the end fittings.
See also:
Radiator grille - removal and refitting
Pre-1988 models
Removal
1 The grille is held in position by four spring
clips (see illustration).
10.1 Radiator grille spring clip - pre-1988 models
2 Once these clips are released, the grille ...
Suspension and steering
The independent front suspension is of the MacPherson strut
type, incorporating coil springs and integral telescopic shock absorbers.
Lateral location of each strut assembly is by a forged or pres ...
Engine/manual gearbox assembly - reconnection and refitting
1 Reverse the procedure described in
paragraphs 1 to 33 of Section 7, noting the
following points.
2 Before attempting to reconnect the engine
to the gearbox, check that the clutch friction
disc ...
