Door mirror - removal and refitting
Manually-operated mirror 1 On remote-control type mirrors, unscrew the bezel from the adjuster knob (see illustration).
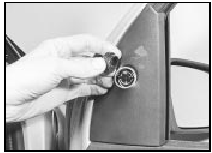
29.1 Unscrew the bezel from the adjuster knob . . .
2 Prise the mirror trim panel from the door (see illustration).
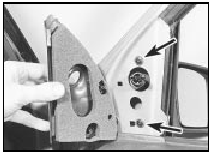
29.2 . . . and prise the mirror trim panel from the door to reveal the 3
mirror securing screws (2 arrowed)
3 Remove the three mirror securing screws, and withdraw the mirror by tilting its rear edge outwards and disengaging its front edge from under the window surround. Where applicable, withdraw the mirror control cable through the door.
4 To remove the mirror glass, proceed as follows according to model.
5 On “high specification” models with fixed (ie not remote control) mirrors, lever the glass assembly outwards to disengage it from the balljoint on the mirror glass mounting.
6 On “low specification” models with fixed (ie not remote control) mirrors, unclip the cover, then remove the securing screw and withdraw the glass assembly (see illustration).
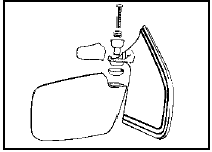
29.6 Fixed door mirror assembly
7 On models with remote control mirrors, insert a thin screwdriver through the hole in the bottom of the mirror assembly, and whilst supporting the glass, release the locking ring (see illustration).
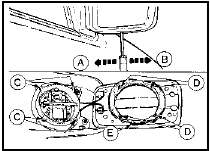
29.7 Manual remote control and electric door mirror glass removal
A Locking operation
B Unlocking operation
C Locating pegs
D Locking slots
E Locking ring
8 Refitting is a reversal of removal, but ensure that the front edge of the mirror is correctly located under the window surround.
Electric mirror
9 Disconnect the battery negative lead.
10 If working on the driver’s side of models up to 1987, prise the mirror switch assembly from the door trim panel and disconnect the wiring plug.
11 If working on the driver’s side of models from 1987, prise the securing screw cover from the mirror control panel, then remove the screw and withdraw the control panel.
Disconnect the wiring plug.
12 On models up to 1987, and when working on the passenger side of models from 1987, prise out the mirror trim panel.
13 Remove the three mirror securing screws, and withdraw the mirror by tilting its rear edge outwards and disengaging its front edge from under the window surround. Withdraw the wiring through the door.
14 To remove the mirror glass proceed as described in paragraph 7.
15 Refitting is a reversal of removal, but ensure that the front edge of the mirror is correctly located under the window surround.
See also:
Wash/wipe system components - removal and refitting
Windscreen washer pump
Engine compartment-mounted
reservoir
Removal
1 Drain the washer fluid container.
2 Disconnect the lead and washer pipe.
3 Ease the top of the washer pump away
from the fl ...
Ford Sierra Service and Repair Manual
Introduction to the Ford Sierra
The Ford Sierra was first introduced in late 1982 with the option of
seven different engines and four different trim levels. This manual
covers the four cylinder in- ...
Road test (Every 12 000 miles (20 000 km) or 12 months)
Instruments and electrical
equipment
1 Check the operation of all instruments and
electrical equipment.
2 Make sure that all instruments read
correctly, and switch on all electrical
equipment in ...
