Seats - removal and refitting
Front seat
1 Slide the seat fully forwards, and on seats
with height adjustment unhook the tension
spring from the rear crosstube. Where
applicable, disconnect the wiring from the
seat heating pad(s).
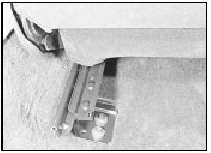
2 Unscrew and remove the two bolts from the inner rear seat mounting bracket and the single bolt from the outer rear seat mounting bracket (see illustration).

47.2 Front seat inner rear mounting
3 Slide the seat fully rearwards, then unscrew and remove the single bolt from each front seat mounting bracket. Withdraw the seat from the vehicle.
4 Refitting is a reversal of removal, but when fitting the front and rear mounting bolts, tighten the inner bolts first in each case.
Where applicable locate the height adjustment tension spring between the weld pips on the crosstube.
Rear seat cushion
5 Remove the single screw from each side,
securing the cushion to the heel kick panel.
6 Pull the cushion forwards and remove it from the vehicle.
7 Refitting is a reversal of removal.
Rear seat backrest
Fixed rear seats
8 Remove the seat cushion as described in
paragraphs 5 to 7.
9 Remove the three now exposed Torx screws from the base of the backrest.
10 Working inside the luggage compartment, remove the three nuts securing the backrest to the body.
11 Pull the backrest forwards into the passenger compartment and remove it from the vehicle. Where applicable, feed the rear seat belt straps and buckles around the edges of the backrest.
12 Refitting is a reversal of removal.
Folding rear seats
13 Release the catch and fold the seat
backrest forwards.
14 Remove the two Torx screws from each backrest hinge.
15 Pull the backrest forwards into the passenger compartment and remove it from the vehicle. Where applicable, feed the rear seat belt straps and buckles around the edges of the backrest.
16 Refitting is a reversal of removal, but where necessary adjust the position of the seat catch striker to achieve correct operation of the catch.
Rear seat side cushion
Saloon models
17 Working in the luggage compartment,
remove the nut from the side cushion stud.
18 Working in the passenger compartment, remove the rear seat cushion as described in paragraphs 5 and 6.
19 Expose the seat backrest hinge bolt by removing the cover, then remove the bolt.
20 Pull the top of the side cushion forwards to disengage the stud from the body.
21 Straighten the metal retaining tangs at the base of the side cushion, then withdraw the cushion.
22 Refitting is a reversal of removal.
Hatchback and Estate models 23 Fold down the rear seat backrest.
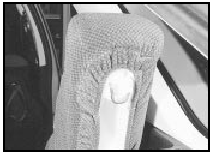
24 Carefully bend back the side cushion lower retaining tangs, then unhook the cushion from the upper fixing on the rear parcel shelf support (see illustration).

47.24 Rear seat side cushion removed exposing upper fixing hook
25 Refitting is a reversal of removal.
Rear seat armrest
26 Fold the rear seat backrest forwards, and
remove the three armrest securing screws.
27 Remove the armrest by prising out the trim clips securing the cover material to the seat backrest.
28 Refitting is a reversal of removal.
See also:
Fuel pump - removal and refitting
The fuel pump is integral with the fuel level
sender unit in the fuel tank. Removal and
refitting are as described in Part C of this
Chapter for models with the CFI system. ...
Oil seals - renewal
Camshaft oil seal
Note: Thread locking compound will be
required to coat the camshaft sprocket bolt on
refitting.
1 Disconnect the battery negative lead.
2 Release the timing belt from the camsha ...
Timing belt renewal - CVH engines (Every 36 000 miles or 3
years)
Refer to Chapter 2, Part B. ...
